
前提:基于红帽商业版glusterfs 3.5
本文主要内容:使用 gdeploy 2 管理 gluster 集群
仅用作经验记录
使用gdeploy便捷部署
前提
- 所有节点已经安装
gdeploy软件包
Red Hat Gluster Storage 默认已经安装 - 配置管理节点至所有 storage 节点的
ssh免密钥登录
- 所有节点已经安装
1 常用部署方式
1.1 通过
PV, VG, and LV的方式快捷创建后端- 参考以下模板
test.conf1
2
3
4
5
6
7
8
9
10
11
12
13
14
15
16
17
18
19
20
21
22
23
24
25[hosts]
serverb.glusterfs.linuxone.in <<<节点
serverc.glusterfs.linuxone.in
[pv]
action=create <<< 创建pv
devices=sdb <<< 创建pv的设备(如果设备名不一致,参考创建vg1的步骤)
[vg1:serverb.glusterfs.linuxone.in] <<<针对 serverb 进行 vg 创建
action=create
vgname=vg_bricks
pvname=sdb
[vg1:serverc.glusterfs.linuxone.in] <<<针对 serverc 进行 vg 创建
action=create
vgname=vg_bricks
pvname=sdb
[lv1] <<<创建lv
action=create
vgname=vg_bricks
lvname=testvol
lvtype=thick
size=2GB
mount /bricks/testvol <<<目录如果不存在会自动挂载到/mnt/gluster1 - 执行配置
1
# gdeploy -c test.conf
- 参考以下模板
1.2 使用
backend-setup配置后端- 参考以下模板
1
2
3
4
5
6
7
8
9
10
11
12
13
14
15
16
17
[hosts]
serverb
serverc
[backend-setup:serverb] <<<针对不同主机的后端配置
devices=sdb
vgs=vg_serverb
pools=brickpool
lvs=lv_serverb
mountpoints=/bricks/serverb
[backend-setup:serverc]
devices=sdb
vgs=vg_serverc
pools=brickpool
lvs=lv_serverc
mountpoints=/bricks/serverc
- 参考以下模板
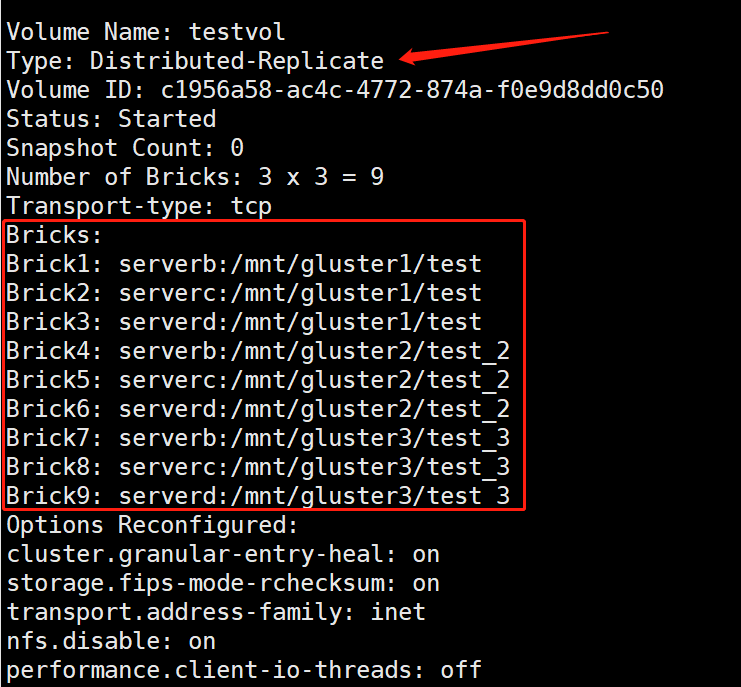
1.3 创建卷组
创建一个
3 x 3的复制卷,注意副本最好不低于31
2
3
4
5
6
7
8
9
10
11
12
13
14[hosts]
serverb
serverc
serverd
[volume]
action=create
volname=testvol
transport=tcp
replica=yes
replica_count=3
brick_dirs=/mnt/gluster1/test,/mnt/gluster2/test_2,/mnt/gluster3/test_3
force=yes创建完成进行检查
1
# gluster volume info testvol
1.4 客户端挂载
参考以下模板
1
2
3
4
5
6[clients]
action=mount
hosts=client.glusterfs.linuxone.in
fstype= glusterfs
client_mount_points=/mnt/client
volname=servera.glusterfs.linuxone.in:testvol任务完成检查
client端是否成功挂载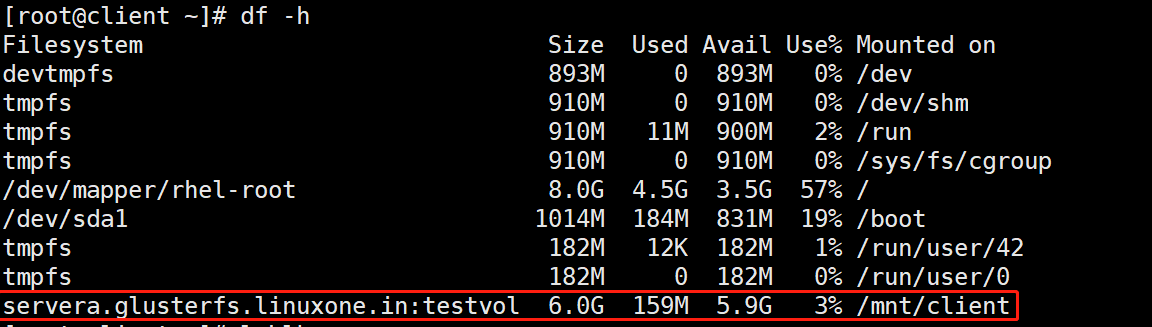
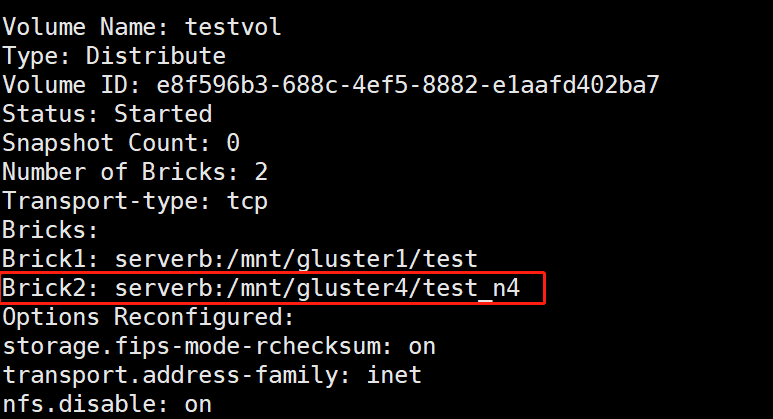
1.5 添加
brick- 参考以下模板
1
2
3
4[volume]
action=add-brick
volname=servera:testvol
bricks=serverb:/mnt/gluster4/test_n4 - 检查是否成功添加
- 参考以下模板
1.6 移除
brick
参考模板1
2
3
4
5
6[volume]
action=remove-brick
force=yes
volname=servera:testvol
bricks=serverb:/mnt/gluster4/test_n4
state=start <<< 其他state为 stop, start, force.1.7
rebalance卷1
2
3
4[volume]
action=rebalance
volname=serverb:testvol
state=start <<< 其他state为 stop, fix-layout.1.8 卷常用操作
启动
1
2
3[volume]
action=start
volname=serverb:testvol停止
1
2
3[volume]
action=stop
volname=serverb:testvol删除
1
2
3[volume]
action=delete
volname=serverb:testvol
- 模板常用配置
[hosts] <<< 主机名 / IP
[devices] <<< 物理设备名 sdb/ vdb
[disktype] <<< 磁盘类型,默认为 jbod ,可以配置 raid10 / raid6 /raid5
[diskcount] <<< 磁盘数量,参数特定于主机。如果 disktype 为 jbod ,则忽略此值
[stripesize] <<< stripe_unit ,如果 disktype 为 jbod ,则忽略, 若为 raid10 ,则默认 256 KB,
即将弃用
- [vgs]
- [pools]
- [lvs]
- [mountpoints] <<< 挂载点
[peer] <<< 受信任存储池
[clients] <<< 客户端
action一般为挂载或卸载hosts客户端 ip / hostnamefstype文件系统类型client_mount_points客户端挂载点,默认为/mnt/gluster
[volume]
- action 支持的操作为
create,delete,add-brick,remove-brick] - volname
- transport 默认是
tcp - replica 如果配置为
yes则为启用副本 - replica_count
replica配置为yes时,指定副本数量 - disperse 分散卷,通过以下指定分散数
- disperse_count 分散卷数量
- redundancy_count
- force 强制创建
- action 支持的操作为
[backend-setup]
- devices
- dalign
- vgs 与设备顺序对应,在设备上创建vg
- pools 在对应vg创建 lv pool
- lvs 在对应pool上创建lv
- mountpoints 挂载点
[pv]
- action 默认为create 和 resize
- devices
- expand 仅与 action resize 时一起使用
- shrink 与 resize 一起使用,收缩到多大
[vg]
- action 可以配置为create 和 extend
- pvname
- vgname
- one-to-one 如果配置为 yes ,则 vg 会和 pv 进行一对一映射,用于多硬盘时,一个硬盘一个vg
[lv]
- action 有四种 action
- create
- lvname
- poolname
- lvtype lv的类型,有 thin 和 thick
- size
- extent 默认是 100%FREE
- force
- vgname
- pvname
- poolmetadatasize 池元数据逻辑卷大小
- virtualsize
- mkfs 创建文件系统类型
- mkfs-opts 文件系统的选项
- mount 挂载
- create
- setup-cache
- ssd ssd设备名,设置缓存
- vgname
- poolname
- cache_meta_lv
- cache_meta_lvsize
- cache_lv
- cache_lvsize
- force
- convert <<< lvconvert
- lvtype
- force
- vgname
- poolmetadata
- cachemode
- cachepool
- lvname
- thinpool
- change
- lvname
- vgname
- zero 精简池变为归零模式
- action 有四种 action
[RH-subscription]
[yum]
[shell]
- action 值为 execute
- command 命令
[update-file]
- action 值有 copy / edit / add
- src
- dest
- replace 匹配要被替换的行
- line 将要替换成的文本
[service]
- action 为 execute
- file 脚本或二进制所在路径
[script]
[firewalld]
[geo-replication]
- action 包括 create / start /stop / pause / resume / delete
- georepuser
- mastervol
- slavevol
- slavenodes ip用,分隔
- force
- start
使用 gdeploy 部署 NFS Ganesha 集群
前提
- 开启以下软件包频道
1
2
3
4
5rhel-7-server-rpms
rh-gluster-3-for-rhel-7-server-rpms
rh-gluster-3-nfs-for-rhel-7-server-rpms
rhel-ha-for-rhel-7-server-rpms
rhel-7-server-ansible-2-rpms
- 开启以下软件包频道
- 安装必须软件包
glusterfs-ganesha1
2
3
4
5
6[yum]
action=install
repolist=
gpgcheck=no
update=no
packages=glusterfs-ganesha
- 安装必须软件包
- 创建一个
NFS-Ganesha的集群1
2
3
4
5
6
7
8
9
10
11
12
13
14
15
16
17
18
19
20
21
22
23
24
25
26
27
28[hosts]
servera.glusterfs.linuxone.in
serverb.glusterfs.linuxone.in
serverc.glusterfs.linuxone.in
serverd.glusterfs.linuxone.in
[backend-setup]
devices=/dev/sdb
vgs=vg_bricks
pools=brickpool
lvs=lv_nfs_ganesha
mountpoints=/mnt/brick
[volume]
action=create
volname=ganesha
transport=tcp
replica_count=4
force=yes
#Creating a high availability cluster and exporting the volume
[nfs-ganesha]
action=create-cluster
ha-name=ganesha-ha-360
cluster-nodes=servera.glusterfs.linuxone.in,serverb.glusterfs.linuxone.in,serverc.glusterfs.linuxone.in,serverd.glusterfs.linuxone.in
vip=192.168.31.100,192.168.31.101
volname=ganesha
ignore_ganesha_errors=no
- 创建一个
3 删除集群
1
2
3[nfs-ganesha]
action=destroy-cluster <<<
cluster-nodes=4 删除节点
1
2
3[nfs-ganesha]
action=delete-node <<<
nodes=
更多请见红帽官方admin文档
使用 gdeploy 配置 samba / CTDB
前提
rhel 7 开启以下软件包频道
1
2
3
4rhel-7-server-rpms
rh-gluster-3-for-rhel-7-server-rpms
rh-gluster-3-samba-for-rhel-7-server-rpms
rhel-7-server-ansible-2-rpmsrhel 8 开启以下软件包频道
1
2
3
4
5
6rh-gluster-3-for-rhel-8-x86_64-rpms
ansible-2-for-rhel-8-x86_64-rpms
rhel-8-for-x86_64-baseos-rpms
rhel-8-for-x86_64-appstream-rpms
rhel-8-for-x86_64-highavailability-rpms
rh-gluster-3-samba-for-rhel-8-x86_64-rpms安装必须的软件包
1
samba,samba-client,glusterfs-server,ctdb
- 在已经有的卷上开启smb
1
2
3
4
5
6
7
8
9
10[hosts]
servera
serverb
[volume]
action=smb-setup <<<
volname=samba1
force=yes
smb_username=smbuser
smb_mountpoint=/mnt/smb
- 在已经有的卷上开启smb
- 创建卷并启用smb
1
2
3
4
5
6
7
8
9
10
11
12
13
14
15
16
17
18
19[hosts]
10.70.37.192
10.70.37.88
10.70.37.65
[backend-setup]
devices=/dev/sdb
vgs=vg_bricks
pools=brickpool
lvs=lv_nfs_ganesha
mountpoints=/mnt/brick
[volume]
action=create
volname=samba1
smb=yes
force=yes
smb_username=smbuser
smb_mountpoint=/mnt/smb
- 创建卷并启用smb
- 配置
CTDB,建议副本数等于samba服务起数1
2
3
4
5
6
7
8
9
10
11
12
13
14
15
16[hosts]
10.70.37.192
10.70.37.88
10.70.37.65
[volume]
action=create
volname=ctdb
transport=tcp
replica_count=3
force=yes
[ctdb]
action=setup
public_address=10.70.37.6/24 eth0,10.70.37.8/24 eth0
volname=ctdb
也可以通过以下参数指定 ctdb的ip
- 配置
1 | ctdb_nodes=192.168.1.1,192.168.2.5 |
gdeploy 日志
日志位置位于 /home/username/.gdeploy/logs/gdeploy.log
可以通过在shell 中 export 路径的方式进行更改,如下:
1 | export GDEPLOY_LOGFILE=/var/log/gdeploy/gdeploy.log |
参考文档为红帽官方管理文档:gluster_administration_guide