
前提:基于红帽商业版glusterfs 3.5
本文主要内容:client端管理,nfs-ganesha 共享存储,smb-ctdb 共享存储原生客户端升级
- 不同版本的repo
- rhel6
- rhel-6-server-rpms
- rhel-6-server-rhs-client-1-rpms
- rhel7
- rhel-7-server-rpms
- rh-gluster-3-client-for-rhel-7-server-rpms
- rhel8
- rh-gluster-3-client-for-rhel-8-x86_64-rpms
- rhel6
- 升级前提请 umount gluster 挂载点
- 升级 glusterfs 客户端
1
# yum update glusterfs glusterfs-fuse
原生客户端glusterfs 常用挂载选项
backup-volfile-servers=serverb:serverc:serverd
备用的卷服务器列表,当主服务器出现故障时,会依次尝试从所有备用服务器进行挂载log-level
配置日志等级log-file
日志存储的位置transport-type
客户端传输类型,默认是 tcpdump-fuse
配置glusterfs客户端生成dump文件ro
只读background-qlen=n
客户端n个请求后的请求将会被拒绝。enable-ino32
启用使文件系统展示32位inode 而不是64位reader-thread-count=n
添加 n 个读取线程,从而提供更好io性能,默认为1lru-limit
在到达 inode 限制后,此mount会从最近最少使用 lru 列表中清除 inodeacl
启用 posix 访问控制列表,可配置acl权限挂载原生客户端,除mount命令外,可以配置
fstab文件:1
servera:/testvol /test glusterfs defaults 0 0
- 如果是子目录,则
1
servera:/testvol/subdir /test glusterfs defaults 0 0
- 如果是子目录,则
NFS 配置 CTDB
- Gluster NFS
1.1 gluster 卷开启 nfs 功能
1
# gluster volume set testvol nfs.disable off
1.2 配置 nfs 被指定网段访问
1
# gluster volume set testvol nfs.rpc-auth-allow '172.25.250.*'
1.3 配置 nfs acl 权限
1
# gluster volume set testvol nfs.acl on
- 为 Gluster NFS 配置 CTDB
- 2.1 为所有 NFS 服务器的节点安装 CTDB
1
# yum install CTDB
- 2.2 修改配置文件(针对rhel7) 并重启nfs服务
1
2
3
4
5
# sed -i '/STATD_PORT/s/^#//' /etc/sysconfig/nfs
# systecmctl restart nfs-config
# systecmctl restart rpc-statd
# systecmctl restart nfs-mountd
# systecmctl restart nfslock - 2.3 配置 CTDB
2.3.0 为ctdb单独配置卷
2.3.1 配置以下文件
1
2
/var/lib/glusterd/hooks/1/start/post/S29CTDBsetup.sh
/var/lib/glusterd/hooks/1/stop/pre/S29CTDB-teardown.sh2.3.2 将 META=’all’ 替换为ctdb卷名 META=’ctdb’
1
# sed -i 's/META="all"/META="ctdb"/g' /var/lib/glusterd/hooks/1/start/post/S29CTDBsetup.sh
2.3.3 启动CTDB 卷
1
# gluster volume start ctdb
2.3.4 检查配置文件是否存在
1
# cat /etc/sysconfig/ctdb
2.3.5 添加节点ip至所有节点配置文件
1
2
3
4
# cat /etc/ctdb/nodes
192.168.31.110
192.168.31.111
192.168.31.1122.3.6 配置所有节点需您ip用于故障迁移
1
2
3
# cat /etc/ctdb/public_addresses
192.168.31.32/24 ens33
192.168.31.33/24 ens332.4 gluster nfs 的ctdb仅提供节点级别高可用,无法检测NFS故障,如果NFS服务的节点仍处于运行状态,则不会提供高可用
- 客户端挂载,仅支持 v3
- 3.1 命令行挂载
1
# mount -t nfs -o vers=3 servera:/ctdb xxx/
- 3.2 开机自动挂载
1
2
# cat /etc/fstab
servera:/ctdb /mnt/xxx nfs defaults,_netdev 0 0 - 3.3 对nfs精细控制
nfs.export-dirs
默认开启,允许客户端在nfs卷创建子目录,提供nfs服务时可以无需指定子目录nfs.export-dir
若配置为on,允许您指定一个或多个导出子目录,参考如下命令1
# gluster set ctdb volume nfs.export-dir /dir1,/dir2(192.168.31.0/24)
NFS Ganesha
- 准备工作(rhel 7)
- 1 配置 NFS Ganesha
- 1.1 安装并配置修改以下内容NFS-Ganesha 支持最小节点数为3,最大节点是8
1
2
3
4
5
6
7
8
9
10
# yum install glusterfs-ganesha -y
# sed -i '/STATD_PORT/s/^#//' /etc/sysconfig/nfs
# systemctl restart nfs-config
# systemctl restart rpc-statd
# sed -i '/STATD_PORT/s/^#//' /etc/sysconfig/nfs
# sed -i '/LOCKD_TCPPORT/s/^#//' /etc/sysconfig/nfs
# sed -i '/LOCKD_UDPPORT/s/^#//' /etc/sysconfig/nfs
# systemctl restart nfs-config
# systemctl restart rpc-statd
# systemctl restart nfslock - 1.2 禁用 kernel-nfs
1
2
# systemctl stop nfs-server
# systemctl disable nfs-server - 1.3 开启全局共享存储
1
# gluster volume set all cluster.enable-shared-storage enable
- 1.4 修改配置文件
ganesha-ha.confHA_NAME="ganesha-ha-360" HA_CLUSTER_NODES="servera.glusterfs.linuxone.in,serverb.glusterfs.linuxone.in,serverc.glusterfs.linuxone.in" VIP_servera_glusterfs_linuxone_in="192.168.31.114" VIP_serverb_glusterfs_linuxone_in="192.168.31.100" VIP_serverc_glusterfs_linuxone_in="192.168.31.99" - 1.5 将配置文件
ganesha.conf&ganesha-ha.conf复制到目标目录/var/run/gluster/shared_storage/nfs-ganesha1
2# mkdir /var/run/gluster/shared_storage/nfs-ganesha
# cp /etc/ganesha/ganesha.conf /etc/ganesha/ganesha-ha.conf /var/run/gluster/shared_storage/nfs-ganesha/ - 1.6 配置以下服务开机启动
1
2
# systemctl enable glusterfssharedstorage.service
# systemctl enable nfs-ganesha
- 1.1 安装并配置修改以下内容
- 配置集群服务
- 2.1 启用 pacemaker 和 pcsd 服务
1
2
# systemctl enable pacemaker.service
# systemctl enable pcsd --now - 2.2 配置
hacluster用户密码1
# echo redhat | passwd --stdin hacluster
- 2.3 为所有节点配置认证
1
2
3
4
5
6# pcs cluster auth servera.glusterfs.linuxone.in serverb.glusterfs.linuxone.in serverc.glusterfs.linuxone.in
Username: hacluster
Password:
serverb.glusterfs.linuxone.in: Authorized
serverc.glusterfs.linuxone.in: Authorized
servera.glusterfs.linuxone.in: Authorized - 2.4 配置 ssh 密钥(在 servera 上执行)
1
2
3
4
5# ssh-keygen -f /var/lib/glusterd/nfs/secret.pem -t rsa -N ''
# ssh-copy-id -i /var/lib/glusterd/nfs/secret.pem.pub root@serverb
# ssh-copy-id -i /var/lib/glusterd/nfs/secret.pem.pub root@serverc
# scp -i /var/lib/glusterd/nfs/secret.pem /var/lib/glusterd/nfs/secret.* root@serverb:/var/lib/glusterd/nfs/
# scp -i /var/lib/glusterd/nfs/secret.pem /var/lib/glusterd/nfs/secret.* root@serverc:/var/lib/glusterd/nfs/
- 通过命令行配置 NFS-Ganesha
- 2.1 配置 ha 集群
1
2
3
4
5# gluster nfs-ganesha enable
Enabling NFS-Ganesha requires Gluster-NFS to be disabled across the trusted pool. Do you still want to continue?
(y/n) y
This will take a few minutes to complete. Please wait ..
nfs-ganesha : success- 如果出现失败的情况,检查 rpc-statd 服务是否监听在 662 端口
1
# rpcinfo -p
- 如果不是,重启 rpc-statd 服务
1
# systemctl restart rpc-statd
- 如果出现失败的情况,检查 rpc-statd 服务是否监听在 662 端口
- 2.2 取消 ha 集群
1
# gluster nfs-ganesha disable
- 2.3 检查集群状态
1
2
3
4
5
6
7
8# /usr/libexec/ganesha/ganesha-ha.sh --status /var/run/gluster/shared_storage/nfs-ganesha
Online: [ servera.glusterfs.linuxone.in serverb.glusterfs.linuxone.in serverc.glusterfs.linuxone.in ]
servera.glusterfs.linuxone.in-cluster_ip-1 servera.glusterfs.linuxone.in
serverb.glusterfs.linuxone.in-cluster_ip-1 serverb.glusterfs.linuxone.in
serverc.glusterfs.linuxone.in-cluster_ip-1 serverc.glusterfs.linuxone.in
Cluster HA Status: HEALTHY - 2.4 配置卷通过 nfs-ganesha 共享
1
# gluster vol set testvol ganesha.enable on
- 2.5 客户端调优
1
2
3# sysctl -w sunrpc.tcp_slot_table_entries=128
# echo 128 > /proc/sys/sunrpc/tcp_slot_table_entries
# echo 128 > /proc/sys/sunrpc/tcp_max_slot_table_entries - 2.6 客户端尝试挂载nfs
- 2.6.1 通过 nfs v3 进行挂载
1
# mount -t nfs -o vers=3 192.168.31.114:/testvol ./nfs/
- 2.6.2 通过 nfs v4 进行挂载
1
2
3
4
5
6
7
8
9
10
11
12# mount -t nfs -o vers=4 192.168.31.114:/testvol ./nfs/
# df
Filesystem 1K-blocks Used Available Use% Mounted on
devtmpfs 914428 0 914428 0% /dev
tmpfs 931516 0 931516 0% /dev/shm
tmpfs 931516 10464 921052 2% /run
tmpfs 931516 0 931516 0% /sys/fs/cgroup
/dev/mapper/rhel-root 8374272 4612860 3761412 56% /
/dev/sda1 1038336 187480 850856 19% /boot
tmpfs 186304 8 186296 1% /run/user/42
tmpfs 186304 0 186304 0% /run/user/0
192.168.31.114:/testvol 2086912 54272 2032640 3% /root/nfs <<< - 2.6.3 nfs 服务端查找客户端的ip
1
2
3
4
5
6
7
8
9
10
11
12
13
14
15
16
17
18
19
20
21
22
23
24
25
26
27
28
29
30
31
32
33
34
35
36
37
38# dbus-send --type=method_call --print-reply --system --dest=org.ganesha.nfsd /org/ganesha/nfsd/ClientMgr org.ganesha.nfsd.clientmgr.ShowClients
method return time=1651848475.811716 sender=:1.73 -> destination=:1.91 serial=3293 reply_serial=2
struct {
uint64 1651848475
uint64 811519666
}
array [
struct {
string "::ffff:192.168.31.108" <<< 客户端 ip
boolean true
boolean true
boolean false
boolean false
boolean false
boolean true
boolean false
boolean false
struct {
uint64 1651848442
uint64 829119794
}
}
struct {
string "::ffff:192.168.31.110" <<< 服务端 ip
boolean false
boolean true
boolean false
boolean false
boolean false
boolean false
boolean false
boolean false
struct {
uint64 1651847866
uint64 926745984
}
}
]
- 2.6.1 通过 nfs v3 进行挂载
- 2.7 添加节点共享存储的配置文件存放目录未来将会从
1
2# /usr/libexec/ganesha/ganesha-ha.sh --add <HA_CONF_DIR> <HOSTNAME> <NODE-VIP>
# /usr/libexec/ganesha/ganesha-ha.sh --add /var/run/gluster/shared_storage/nfs-ganesha serverd 192.168.31.98/var/run/gluster/更改为/run/gluster/ - 2.8 删除节点
1
2# /usr/libexec/ganesha/ganesha-ha.sh --delete <HA_CONF_DIR> <HOSTNAME>
# /usr/libexec/ganesha/ganesha-ha.sh --delete /var/run/gluster/shared_storage/nfs-ganesha serverd - 2.9 配置 nfs 默认 exports 的配置
- 2.9.1 流程
- 修改exports 配置文件
/run/gluster/shared_storage/nfs-ganesha/exports/export.testvol.conf - 重新加载配置
1
2# /usr/libexec/ganesha/ganesha-ha.sh --refresh-config <HA_CONF_DIR> <volname>
# /usr/libexec/ganesha/ganesha-ha.sh --refresh-config /run/gluster/shared_storage/nfs-ganesha/ testvol
- 修改exports 配置文件
- 2.9.2 为特定客户端进行配置
1
2
3
4
5
6
7client {
clients = 192.168.31.108; # 客户端 ip
access_type = "RO"; # Read-only
Protocols = "3"; # 仅支持 nfs v3
anonymous_uid = 1440;
anonymous_gid = 72;
} - 2.9.3 开启 nfs v4 acl 权限
1
Disable_ACL = false;
- 2.9.4 配置 nfs v4 伪路径
1
Pseudo = "pseudo_path"
- 2.9.1 流程
- 2.10 配置 nfs 共享子目录
- 2.10.1 方式一
- 2.10.1.1 配置单独共享 exports 文件,好处是不会影响已经连接到该nfs server 的客户端
1
2
3
4
5
6
7
8
9
10
11
12
13
14
15
16
17
18
19# cat export.testvol-subdir.conf
EXPORT{
Export_Id = 3; <<< id 要不同于其他
Path = "/testvol/subdir"; <<< dir在 vol 下面的路径
FSAL {
name = GLUSTER;
hostname="localhost";
volume="testvol";
volpath="/subdir"; <<< dir在 vol 中的路径
}
Access_type = RW;
Disable_ACL = true;
Squash="No_root_squash";
Pseudo="/testvol/subdir"; <<< dir在 vol 下面的路径
Protocols = "3", "4";
Transports = "UDP","TCP";
SecType = "sys";
} - 2.10.1.2 配置文件
/etc/ganesha/ganesha.conf添加条目1
%include "/var/run/gluster/shared_storage/nfs-ganesha/exports/export.testvol-subdir.conf"
- 2.10.1.3 重新配置 nfs-ganesha
1
2
3
4# /usr/libexec/ganesha/ganesha-ha.sh --refresh-config /run/gluster/shared_storage/nfs-ganesha/ testvol-subdir
Refresh-config completed on serverb.
Refresh-config completed on serverc.
Success: refresh-config completed. - 2.10.1.4 客户端进行检测
1
2
3
4# showmount -e 192.168.31.114
Export list for 192.168.31.114:
/testvol (everyone)
/testvol/subdir (everyone) <<<
- 2.10.1.1 配置单独共享 exports 文件,好处是不会影响已经连接到该nfs server 的客户端
- 2.10.2 方式二
- 2.10.2.1 使用 subdir 条目编辑卷的 export 文件。此方法只会导出子目录而不是父卷。
1
2
3
4
5
6
7
8
9
10
11
12
13
14
15
16
17EXPORT{
Export_Id = 4;
Path = "/testvol/subdir";
FSAL {
name = GLUSTER;
hostname="localhost";
volume="testvol";
volpath="/subdir";
}
Access_type = RW;
Disable_ACL = true;
Squash="No_root_squash";
Pseudo="/testvol/subdir";
Protocols = "3", "4" ;
Transports = "UDP","TCP";
SecType = "sys";
}
- 2.10.2.1 使用 subdir 条目编辑卷的 export 文件。此方法只会导出子目录而不是父卷。
- 2.10.3 取消共享子目录
- 2.10.3.1 获取共享的 ID,如
2.10.1.1共享id 为3 - 2.10.3.2 删除配置文件
1
# rm -rf /var/run/gluster/shared_storage/nfs-ganesha/exports/
- 2.10.3.3 移除配置文件中对应条目
/etc/ganesha/ganesha.conf - 2.10.3.4 执行以下命令移除
1
# dbus-send --print-reply --system --dest=org.ganesha.nfsd /org/ganesha/nfsd/ExportMgr org.ganesha.nfsd.exportmgr.RemoveExport uint16:3
- 2.10.3.1 获取共享的 ID,如
- 2.10.1 方式一
- 2.11 开启
all_squash1
Squash = all_squash
- NFS Ganesha 停机维护
- 3.1 ganesha 集群的宽限期最长为 20s,最大故障转移时间 20-22 秒,
- 3.2 调整宽限期为 90秒
1
2
3
4
5# vim /etc/ganesha/ganesha.conf
NFSv4 {
Grace_Period=<grace_period_value_in_sec>;
}
# systemctl restart nfs-ganesha
- NFS Ganesha 调整
Readdir性能修改配置文件1
2
3NFS-Ganesha 进程在实例中读取目录的全部内容。该目录上的任何并行操作都会暂停,直到 readdir 操作完成。
在 Red Hat Gluster Storage 3.5 中,该Dir_Chunk参数允许在实例中以块的形式读取目录内容。
该参数默认启用。此参数的默认值为128。此参数的范围是1到UINT32_MAX。要禁用此参数,请将值设置为01
2
3
4
5
6
7# vim /etc/ganesha/ganesha.conf
CACHEINODE {
Entries_HWMark = 125000;
Chunks_HWMark = 1000;
Dir_Chunk = 128; # Range: 1 to UINT32_MAX, 0 to disable
}
# systemctl restart nfs-ganesha
- NFS Ganesha 调整
- Troubleshooting NFS Ganesha
- 5.1 服务进行强制检查
1
2
3
4# service nfs-ganesha status
# service pcsd status
# service pacemaker status
# pcs status - 5.2 常用日志
1
2
3
4/var/log/ganesha/ganesha.log
/var/log/ganesha/ganesha-gfapi.log
/var/log/messages
/var/log/pcsd.log - 5.3 出现 nfs-ganesha HA 集群设置失败时需要清理。
将机器复原成原始状态1
2
3# /usr/libexec/ganesha/ganesha-ha.sh --teardown /var/run/gluster/shared_storage/nfs-ganesha
# /usr/libexec/ganesha/ganesha-ha.sh --cleanup /var/run/gluster/shared_storage/nfs-ganesha
# systemctl stop nfs-ganesha
SMB 共享
- ctdb 配置 smb 高可用
- 1.1 安装 ctdb
1
# yum install ctdb -y
- 1.2 在 gluster 存储节点配置 ctdb
- 1.2.1 创建 ctdb 卷
1
# gluster volume create ctdb replica 3 192.168.31.112:/bricks/ctdb/b1 192.168.31.110:/bricks/ctdb/b2 192.168.31.111:/bricks/ctdb/b3
- 1.2.2 修改配置将
META="all"修改为META="ctdb"1
2/var/lib/glusterd/hooks/1/start/post/S29CTDBsetup.sh
/var/lib/glusterd/hooks/1/stop/pre/S29CTDB-teardown.sh - 1.2.3 配置
/etc/samba/smb.conf1
clustering=yes
- 1.2.4 启动 ctdb 卷
1
# gluster volume start ctdb
- 1.2.5 创建
/etc/ctdb/nodes1
2
3
4# cat /etc/ctdb/nodes
192.168.31.110
192.168.31.111
192.168.31.112 - 1.2.6 配置虚拟IP
/etc/ctdb/public_addresses1
2# cat /etc/ctdb/public_addresses
192.168.31.114/24 ens33 - 1.2.7 启动 CTDB 服务
1
# systemctl start ctdb
- 1.2.8 检查 ctdb 服务状态
1
2
3
4
5
6
7
8
9
10
11
12# ctdb status
Number of nodes:3
pnn:0 192.168.31.110 OK (THIS NODE)
pnn:1 192.168.31.111 OK
pnn:2 192.168.31.112 OK
Generation:177693459
Size:3
hash:0 lmaster:0
hash:1 lmaster:1
hash:2 lmaster:2
Recovery mode:NORMAL (0)
Recovery master:1
- 1.2.1 创建 ctdb 卷
- 通过 SMB 共享卷
- 2.1 默认共享卷的配置 /etc/samba/smb.conf
1
2
3
4
5
6
7
8
9[gluster-VOLNAME]
comment = For samba share of volume VOLNAME
vfs objects = glusterfs
glusterfs:volume = VOLNAME
glusterfs:logfile = /var/log/samba/VOLNAME.log
glusterfs:loglevel = 7
path = /
read only = no
guest ok = yes - 2.2 版本 samba-4.8.5-104 及以上进行以下配置
- 2.2.1 为卷开启 user.cifs 及 user.smb
1
2
3
4
5
6# gluster volume set testvol user.cifs enable
# gluster volume set testvol user.smb enable
# gluster volume set testvol group samba
# gluster volume set testvol stat-prefetch off
# gluster volume set testvol server.allow-insecure on
# gluster volume set testvol storage.batch-fsync-delay-usec 0 - 2.2.2 添加 smb 用户
1
# smbpasswd -a root
- 2.2.3 添加以下配置,并重启 glusterd 服务
1
2
3
4
5
# vim /etc/glusterfs/glusterd.vol <<< 所有节点进行配置
option rpc-auth-allow-insecure on
# systemctl restart glusterd
# gluster volume stop testvol
# gluster volume start testvol
- 2.2.1 为卷开启 user.cifs 及 user.smb
- 2.3 客户端配置 smb 共享
- 2.3.1 检测服务端 smb 共享
1
2
3
4
5
6
7
8
9
10# smbclient -L 192.168.31.114 -U%
Sharename Type Comment
--------- ---- -------
gluster-testvol Disk For samba share of volume testvol <<<
IPC$ IPC IPC Service (Samba Server Version 4.11.6)
Reconnecting with SMB1 for workgroup listing.
smbXcli_negprot_smb1_done: No compatible protocol selected by server.
protocol negotiation failed: NT_STATUS_INVALID_NETWORK_RESPONSE
Unable to connect with SMB1 -- no workgroup available - 2.3.2 测试挂载 smb 共享
1
2
3
4
5
6
7
8
9
10# smbclient //192.168.31.114/gluster-testvol -U root%redhat
Try "help" to get a list of possible commands.
smb: \> mkdir test
smb: \> ls
. D 0 Sat May 7 14:28:05 2022
.. D 0 Sat May 7 14:28:05 2022
test D 0 Sat May 7 14:28:05 2022
2086912 blocks of size 1024. 2032632 blocks available
smb: \> exit - 2.3.3 win 尝试挂载smb目录
- 2.3.3.1 进行以下配置
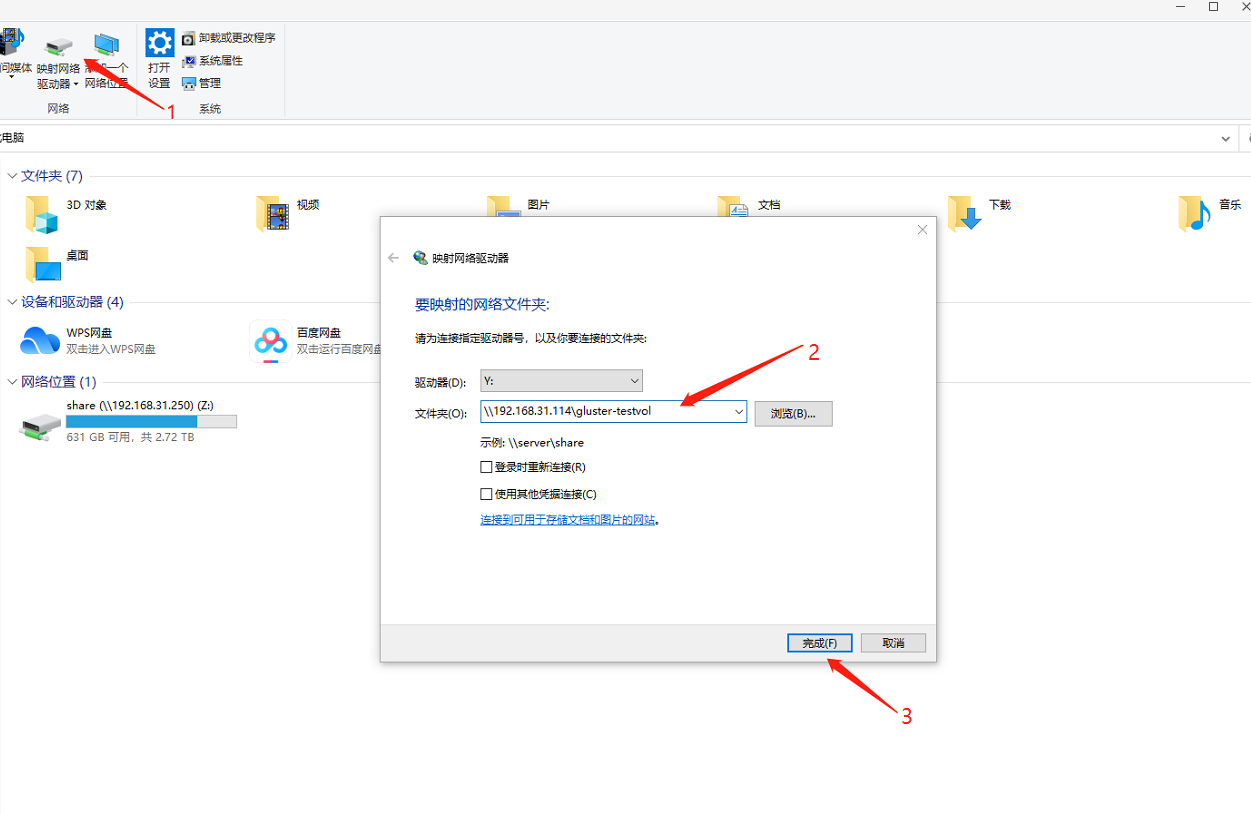
- (1) 点击添加映射
- (2) 输入共享路径
1
\\192.168.31.114\gluster-testvol
- (3) 点击完成添加
- 2.3.3.2 添加后可以打开该共享存储
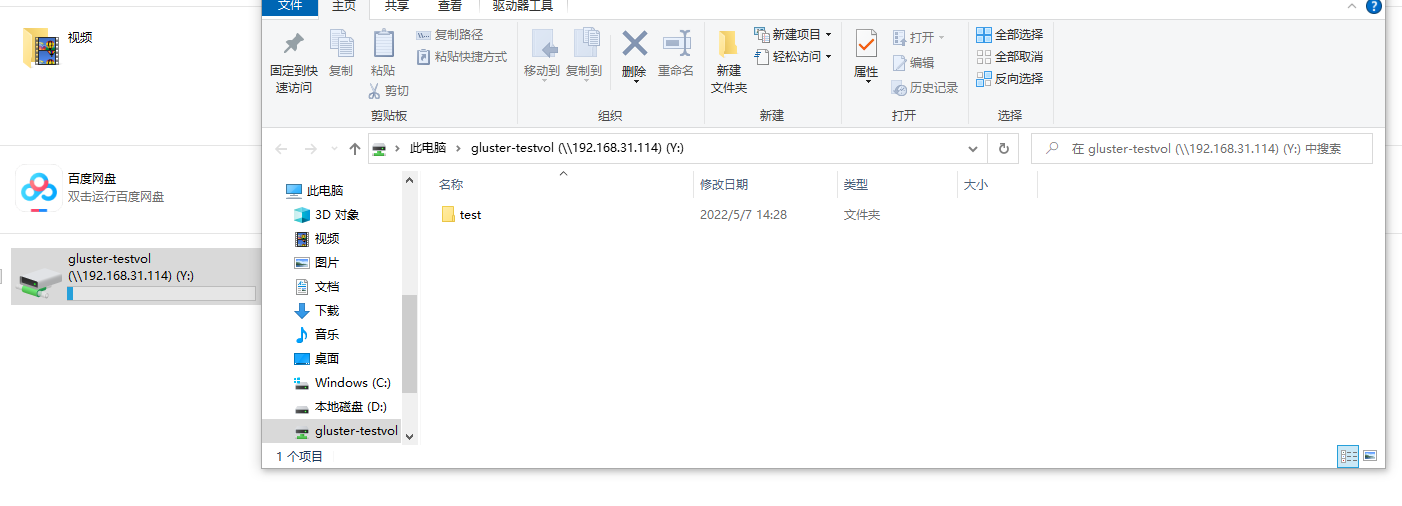
- 2.3.3.1 进行以下配置
- 2.3.1 检测服务端 smb 共享
- 性能调整
- 3.1 启用元数据缓存
- 启用元数据缓存
1
# gluster volume set <volname> group metadata-cache
- 启用元数据缓存
- 增加缓存文件个数 设置为 50000,如果卷中活动文件数量非常多,可以增加,但是增加这个数字会增加 brick 进程的内存占用
1
# gluster volume set <VOLNAME> network.inode-lru-limit <n>
- 增加缓存文件个数
- 3.2 提高目录列表性能
随着卷中 brick 数量增加,目录列表会变慢,但是文件/目录编号保持不变。通过启用readdir卷选项,
目录列表的性能独立于卷中brick的数量。因此,卷规模增加便不会降低目录列表的性能。
只有当卷的分发计数为 2 或更大并且目录的大小很小(< 3000 个条目)时,才能期望性能提高。
卷(分布计数)越大,性能优势就越大。- 启用
readdir1
# gluster volume set <VOLNAME> performance.readdir-ahead on
- 启用
- 启用
parallel-readdri1
# gluster volume set <VOLNAME> performance.parallel-readdir on
- 启用
- 如果卷有超过50个 brick,建议缓存增加到 10Mb以上
1
# gluster volume set <VOLNAME> performance.rda-cache-limit <CACHE SIZE>
- 如果卷有超过50个 brick,建议缓存增加到 10Mb以上
- 3.3 增强文件/目录创建性能
在创建/重命名任何文件之前,会发送查找(在 SMB 中为 5-6)以验证文件是否已存在。
通过在可能的情况下从缓存中提供这些查找,在 SMB 访问中将创建/重命名性能提高了多倍。
启用缓存启用后,缓存超时失效时间增加到10分钟1
# gluster volume set <volname> group nl-cache
检查客户端
- 检查客户端版本
1
# gluster volume status volname clients
- 检查客户端版本
- 对于旧版本的 glusterfs (3.2 版本及以上)
- 为要检查客户端的卷进行状态转储
1
# gluster volume statedump volname
- 为要检查客户端的卷进行状态转储
- 找到状态转储的目录
1
# gluster --print-statedumpdir
- 找到状态转储的目录
- 找到客户端信息
1
# grep -A4 "identifier=client_ip" statedumpfile
- 找到客户端信息