
 红帽 Ceph4 部署
使用 cockpit / ceph-ansible 方式进行部署 环境准备
Ceph4 环境如下
主机名 IP 角色 cepha.linuxone.in 192.168.31.50 _admin mon mgr cephb.linuxone.in 192.168.31.51 mon osd mgr cephc.linuxone.in 192.168.31.52 mon osd 所有主机都有 sdb sdc sdd 三块硬盘用于创建 osd Ceph4 主机所需的 repo 如下
- RHEL 7:
1
2
3
4
rhel-7-server-rhceph-4-tools-rpms
rhel-7-server-ansible-2.9-rpms
rhel-7-server-rhceph-4-mon-rpms
rhel-7-server-rhceph-4-osd-rpms - RHEL 8:
1
2
3
4
rhceph-4-tools-for-rhel-8-x86_64-rpms
ansible-2.9-for-rhel-8-x86_64-rpms
rhceph-4-mon-for-rhel-8-x86_64-rpms
rhceph-4-osd-for-rhel-8-x86_64-rpms
- RHEL 7:
Ceph4 使用容器化部署,需要下载的容器镜像为:
1
2
3
4
5
registry.redhat.io/rhceph/rhceph-4-rhel8:latest
registry.redhat.io/openshift4/ose-prometheus-node-exporter:v4.6
registry.redhat.io/rhceph/rhceph-4-dashboard-rhel8:latest
registry.redhat.io/openshift4/ose-prometheus:v4.6
registry.redhat.io/openshift4/ose-prometheus-alertmanager:v4.6防火墙配置:
1
2
3
4
5
6
7
8
9
10
11
12
13
14
15
16
17
18
19
20
21
22
23
MON 配置
# firewall-cmd --zone=public --add-port=3300/tcp
# firewall-cmd --zone=public --add-port=3300/tcp --permanent
# firewall-cmd --zone=public --add-port=6789/tcp
# firewall-cmd --zone=public --add-port=6789/tcp --permanent
# firewall-cmd --permanent --add-service=ceph-mon
# firewall-cmd --add-service=ceph-mon
OSD 配置
# firewall-cmd --zone=public --add-port=6800-7300/tcp
# firewall-cmd --zone=public --add-port=6800-7300/tcp --permanent
# firewall-cmd --permanent --add-service=ceph
# firewall-cmd --add-service=ceph
RGW 配置
# firewall-cmd --zone=public --add-port=8080/tcp
# firewall-cmd --zone=public --add-port=8080/tcp --permanent
# firewall-cmd --zone=public --add-port=80/tcp
# firewall-cmd --zone=public --add-port=80/tcp --permanent
# firewall-cmd --zone=public --add-port=443/tcp
# firewall-cmd --zone=public --add-port=443/tcp --permanent
# firewall-cmd --zone=public --add-port=9090/tcp
# firewall-cmd --zone=public --add-port=9090/tcp --permanent
使用 ceph-cockpit 安装集群
- 安装 cockpit
1
2
3
# dnf install cockpit -y
# systemctl enable --now cockpit.socket
# dnf install cockpit-ceph-installer
- 安装 cockpit
- 运行 ansible 以下容器
1
2
3
4
5
6
7
# ansible-runner-service.sh -s
最后的输出如下:
The Ansible API container (runner-service) is available and responding to requests
Login to the cockpit UI at https://cepha.linuxone.in:9090/cockpit-ceph-installer to start the install
Linking the runner service inventory to ceph-ansible hosts
- ansible hosts linked to runner-service inventory
- 运行 ansible 以下容器
- 将 Cockpit Ceph Installer SSH 密钥复制到集群中的所有节点
1
ssh-copy-id -f -i /usr/share/ansible-runner-service/env/ssh_key.pub root@cepha
- 将 Cockpit Ceph Installer SSH 密钥复制到集群中的所有节点
- 完成 Cockpit Ceph Installer 的 Environment 页面
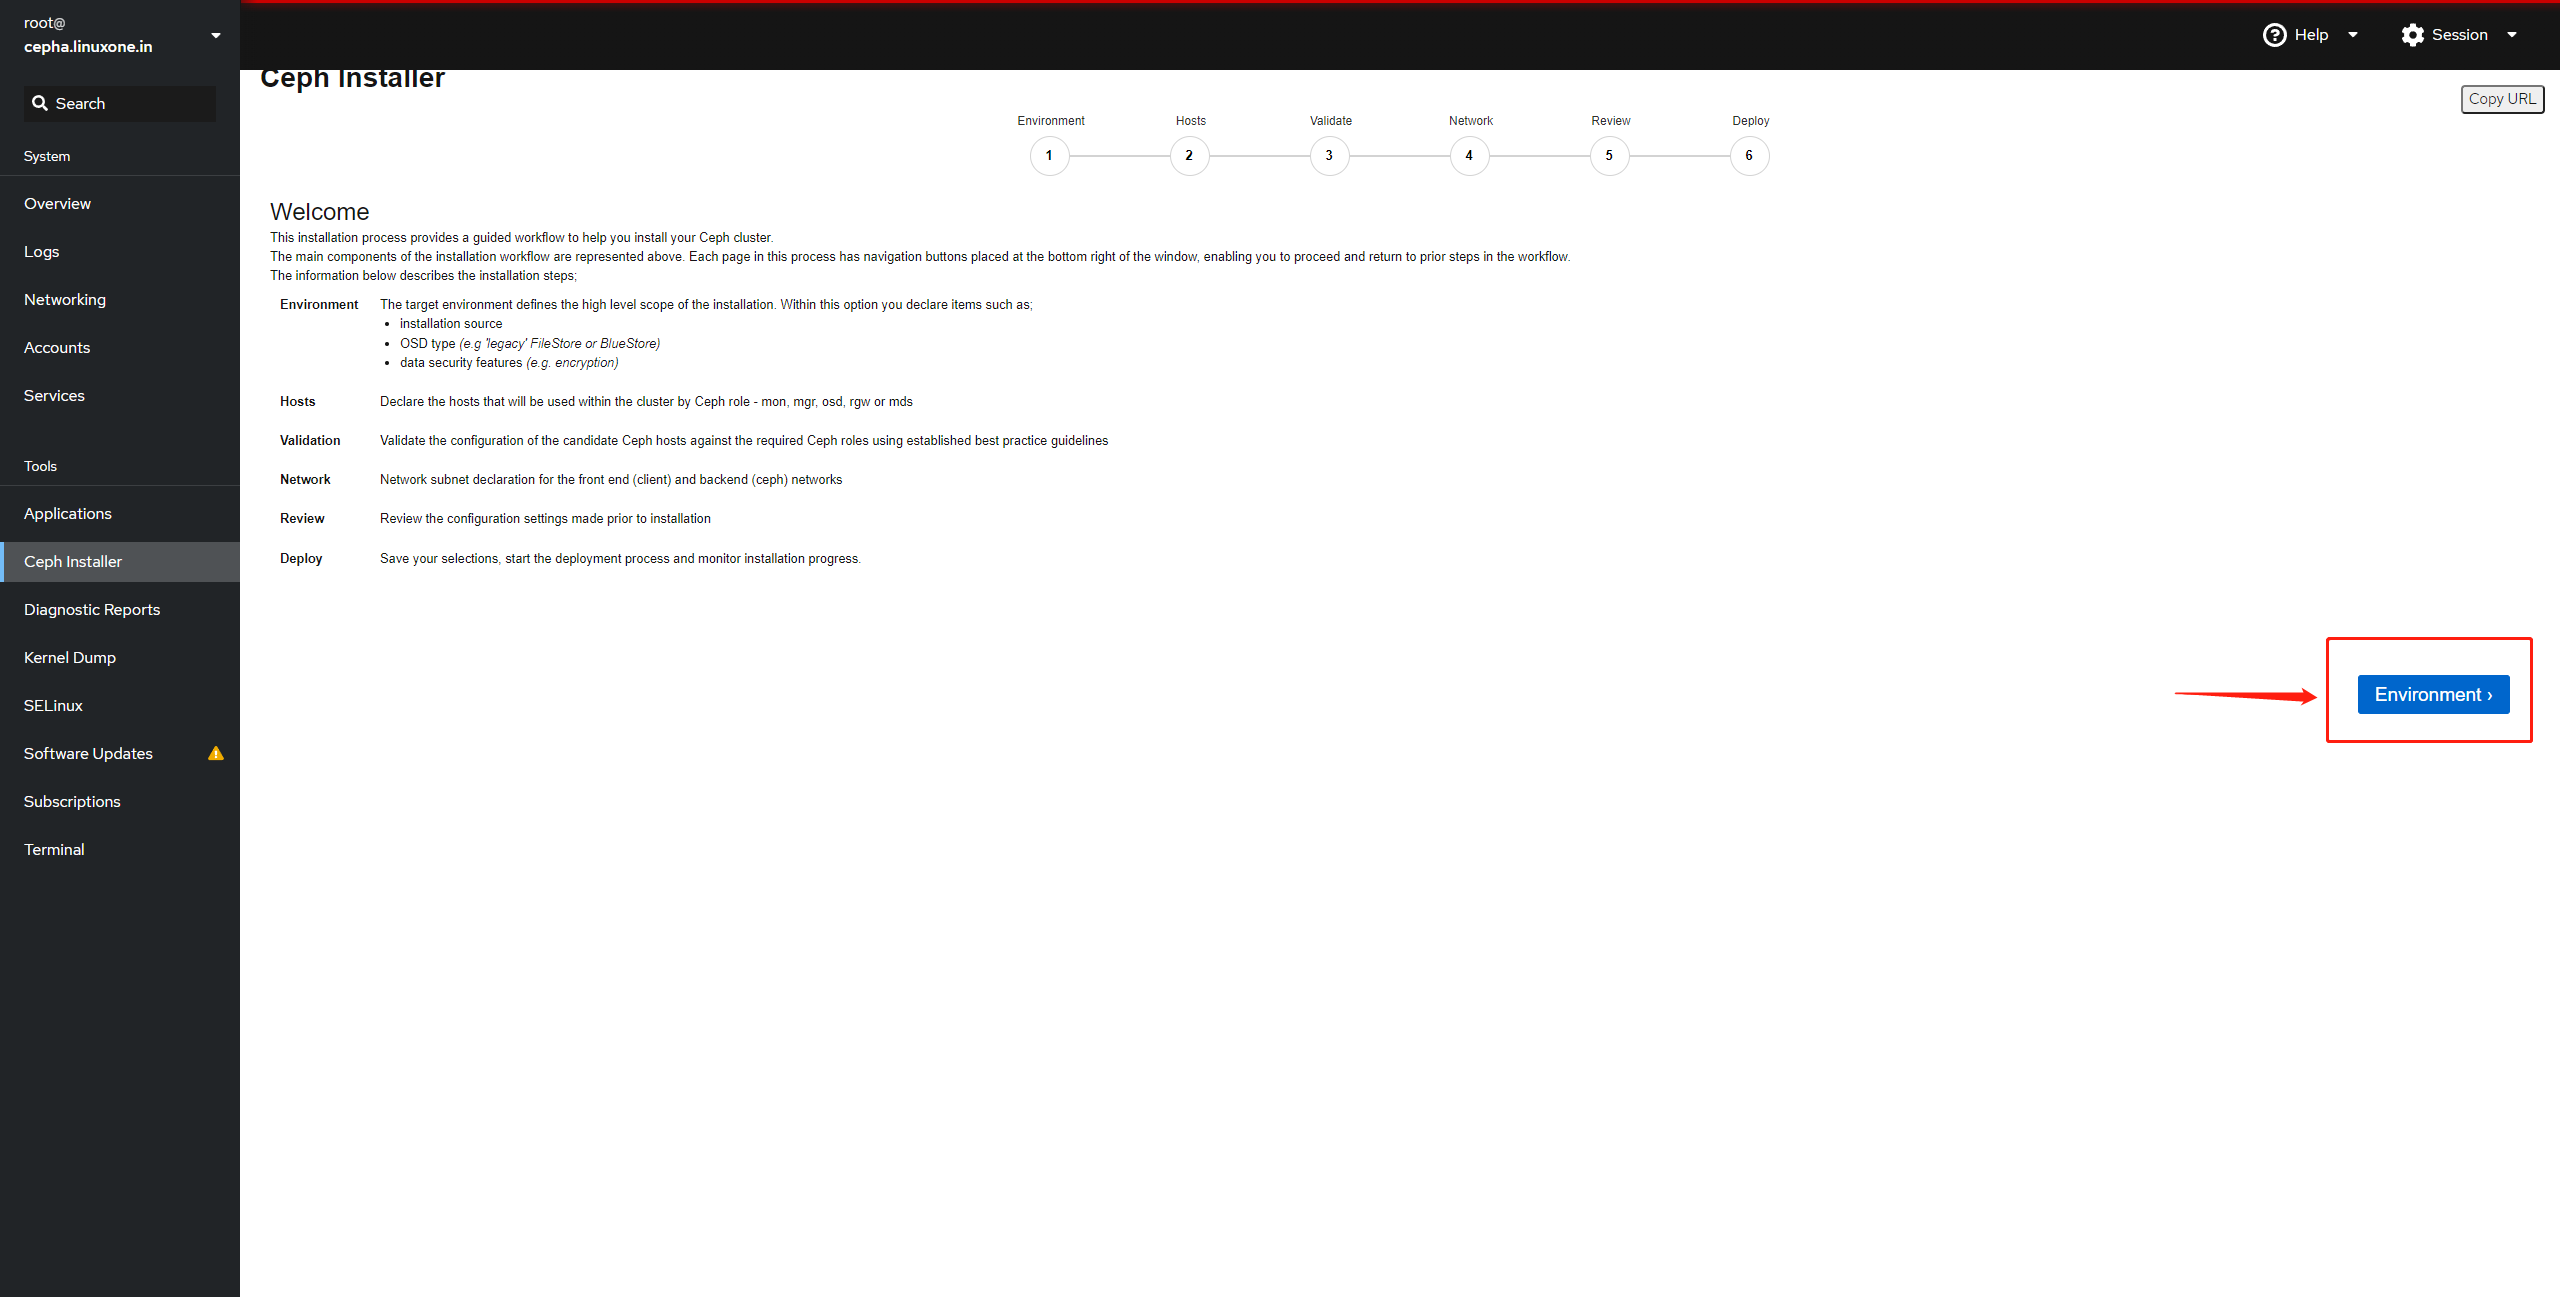
- 4.1 参考图中配置,基于 RPM 进行安装
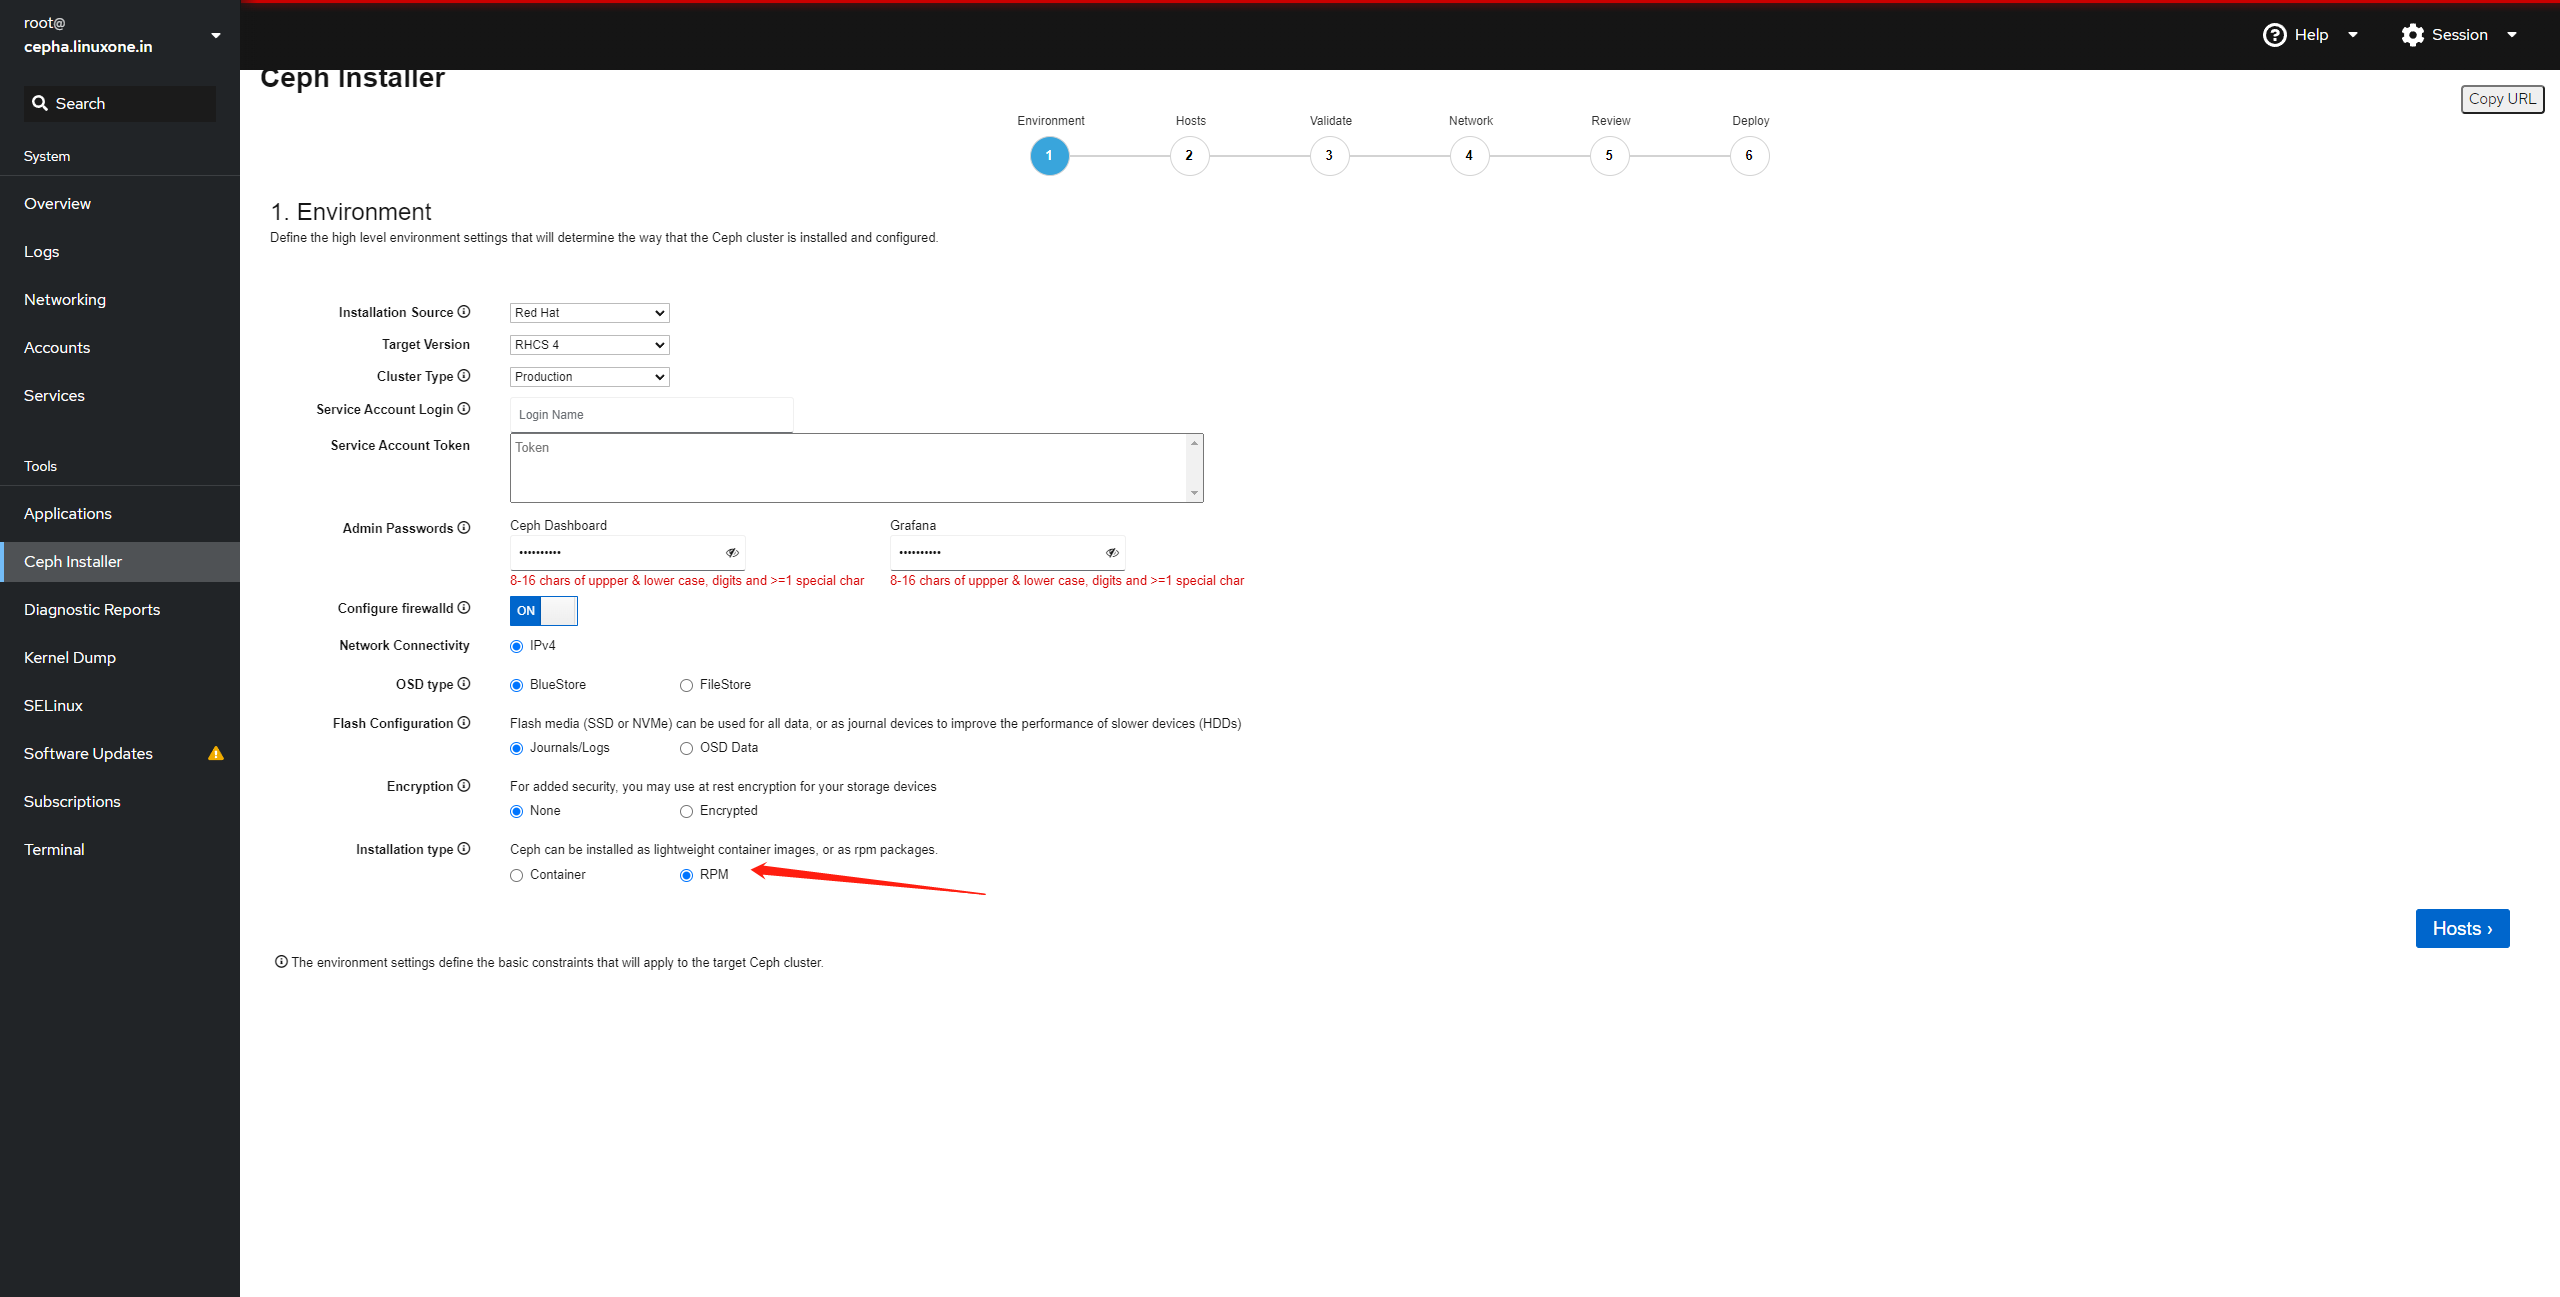
- 完成 Cockpit Ceph Installer 的 Environment 页面
- 完成 Cockpit Ceph Installer 的 Host 页面
- 5.1 点击
add host添加主机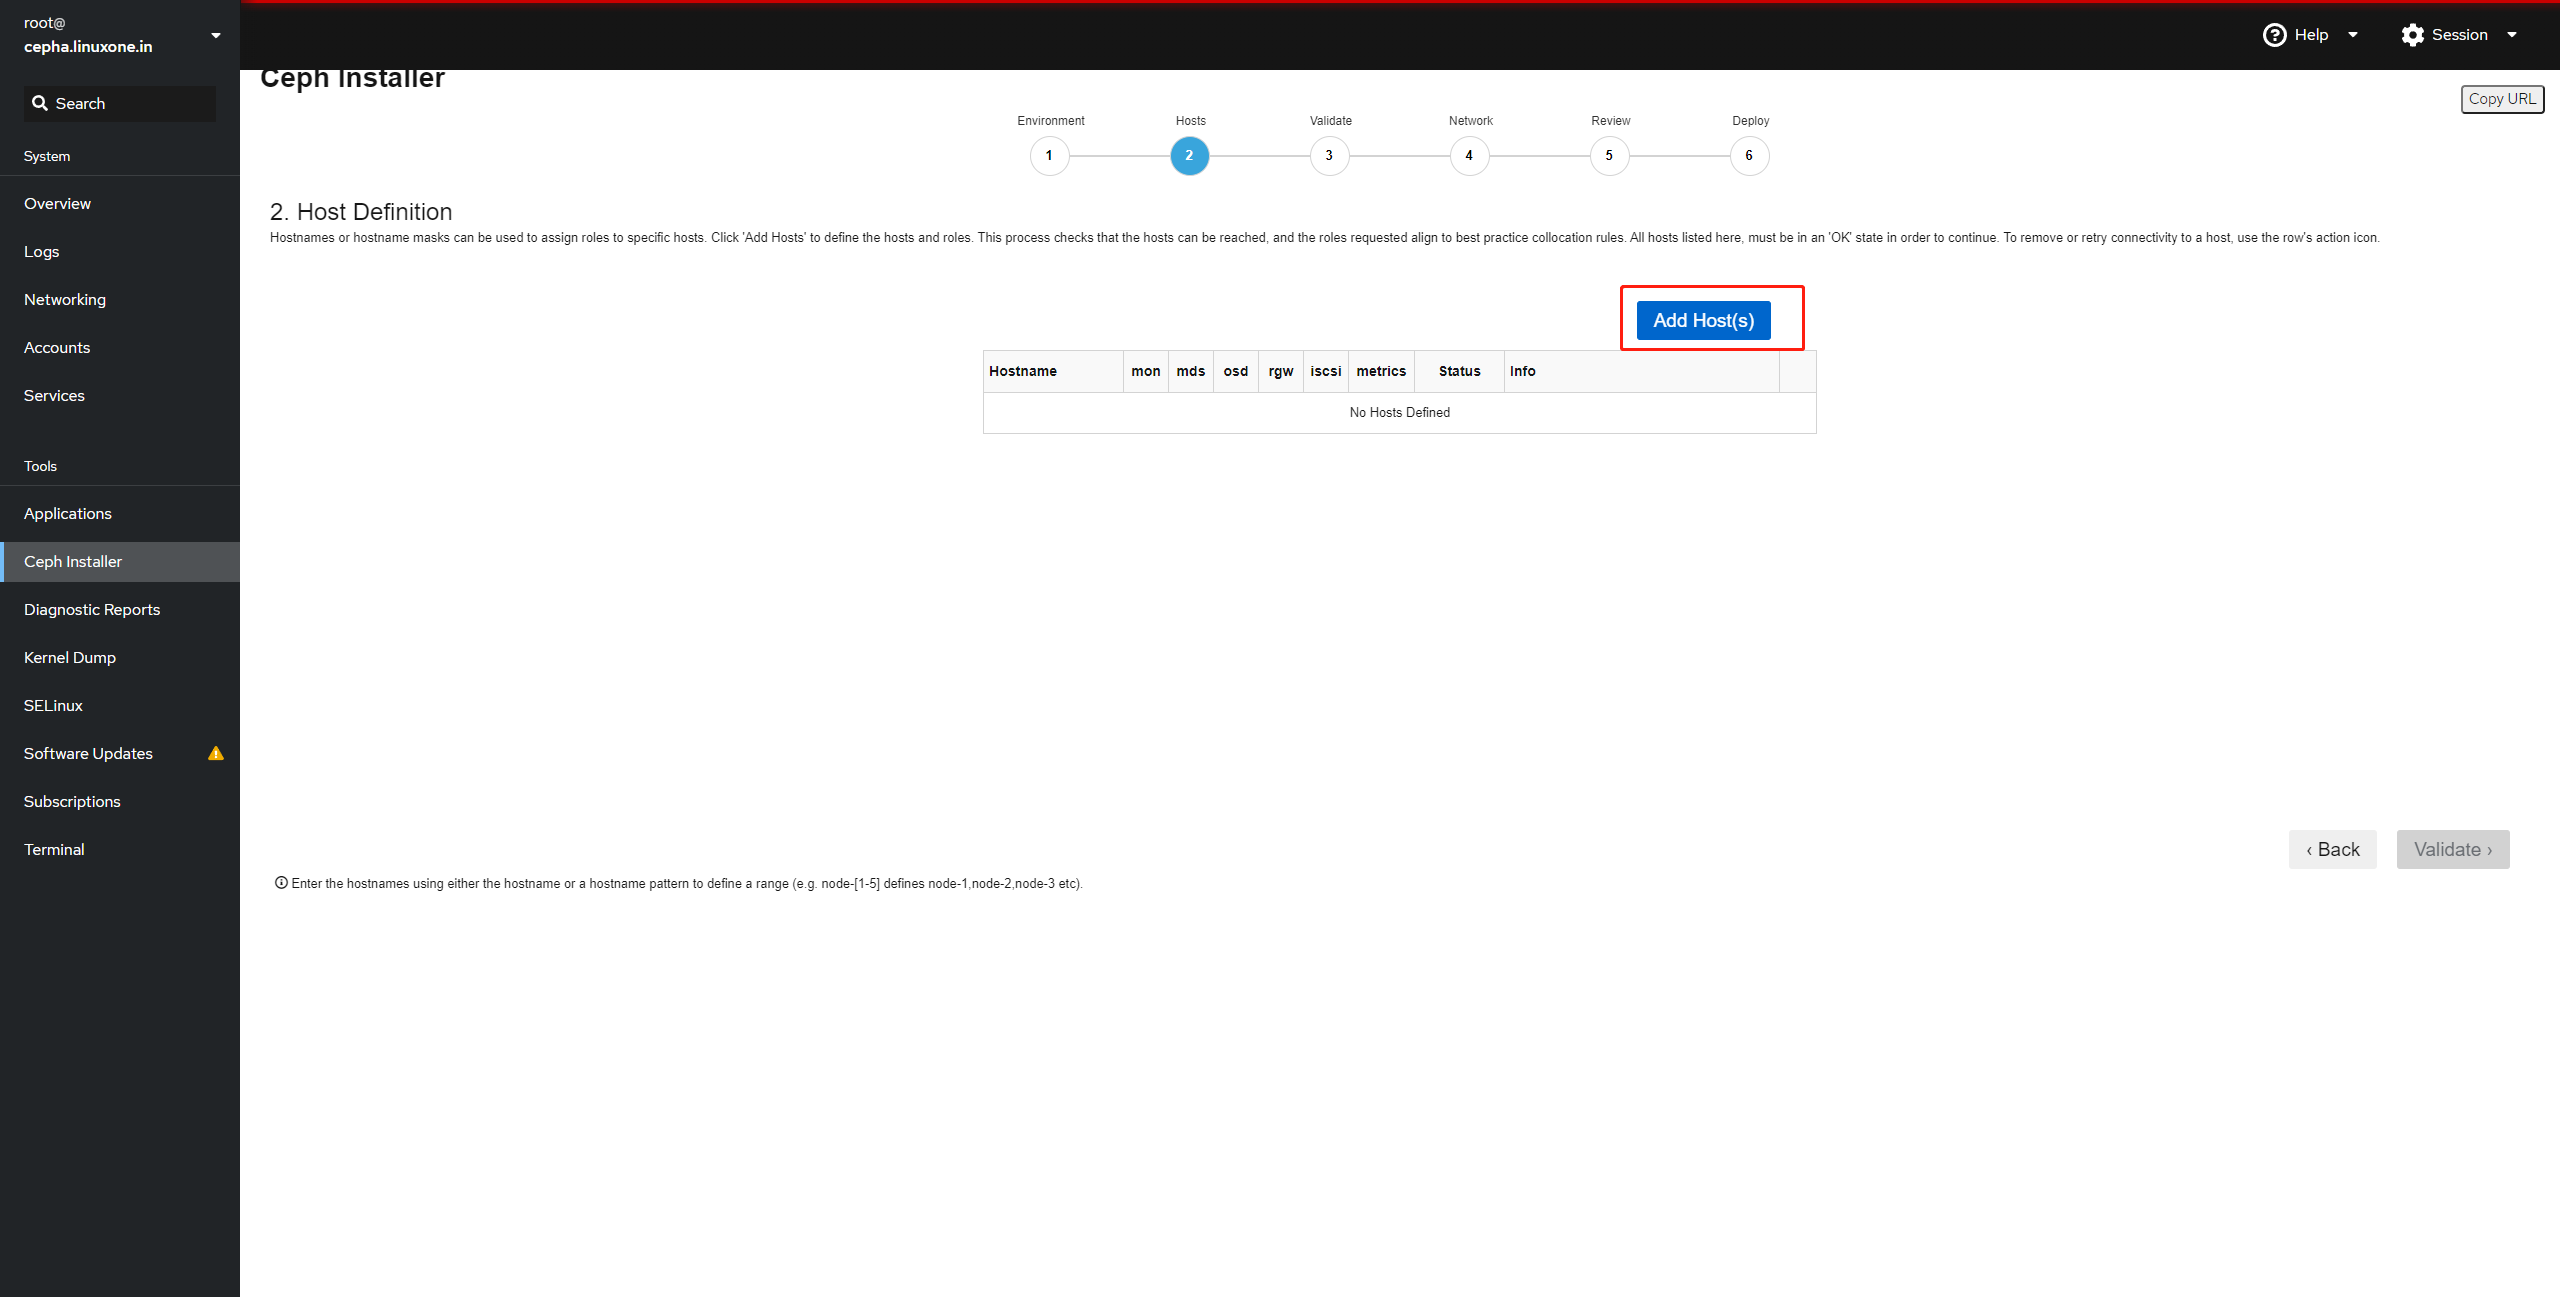
- 5.2 添加主机

- 5.3 验证主机
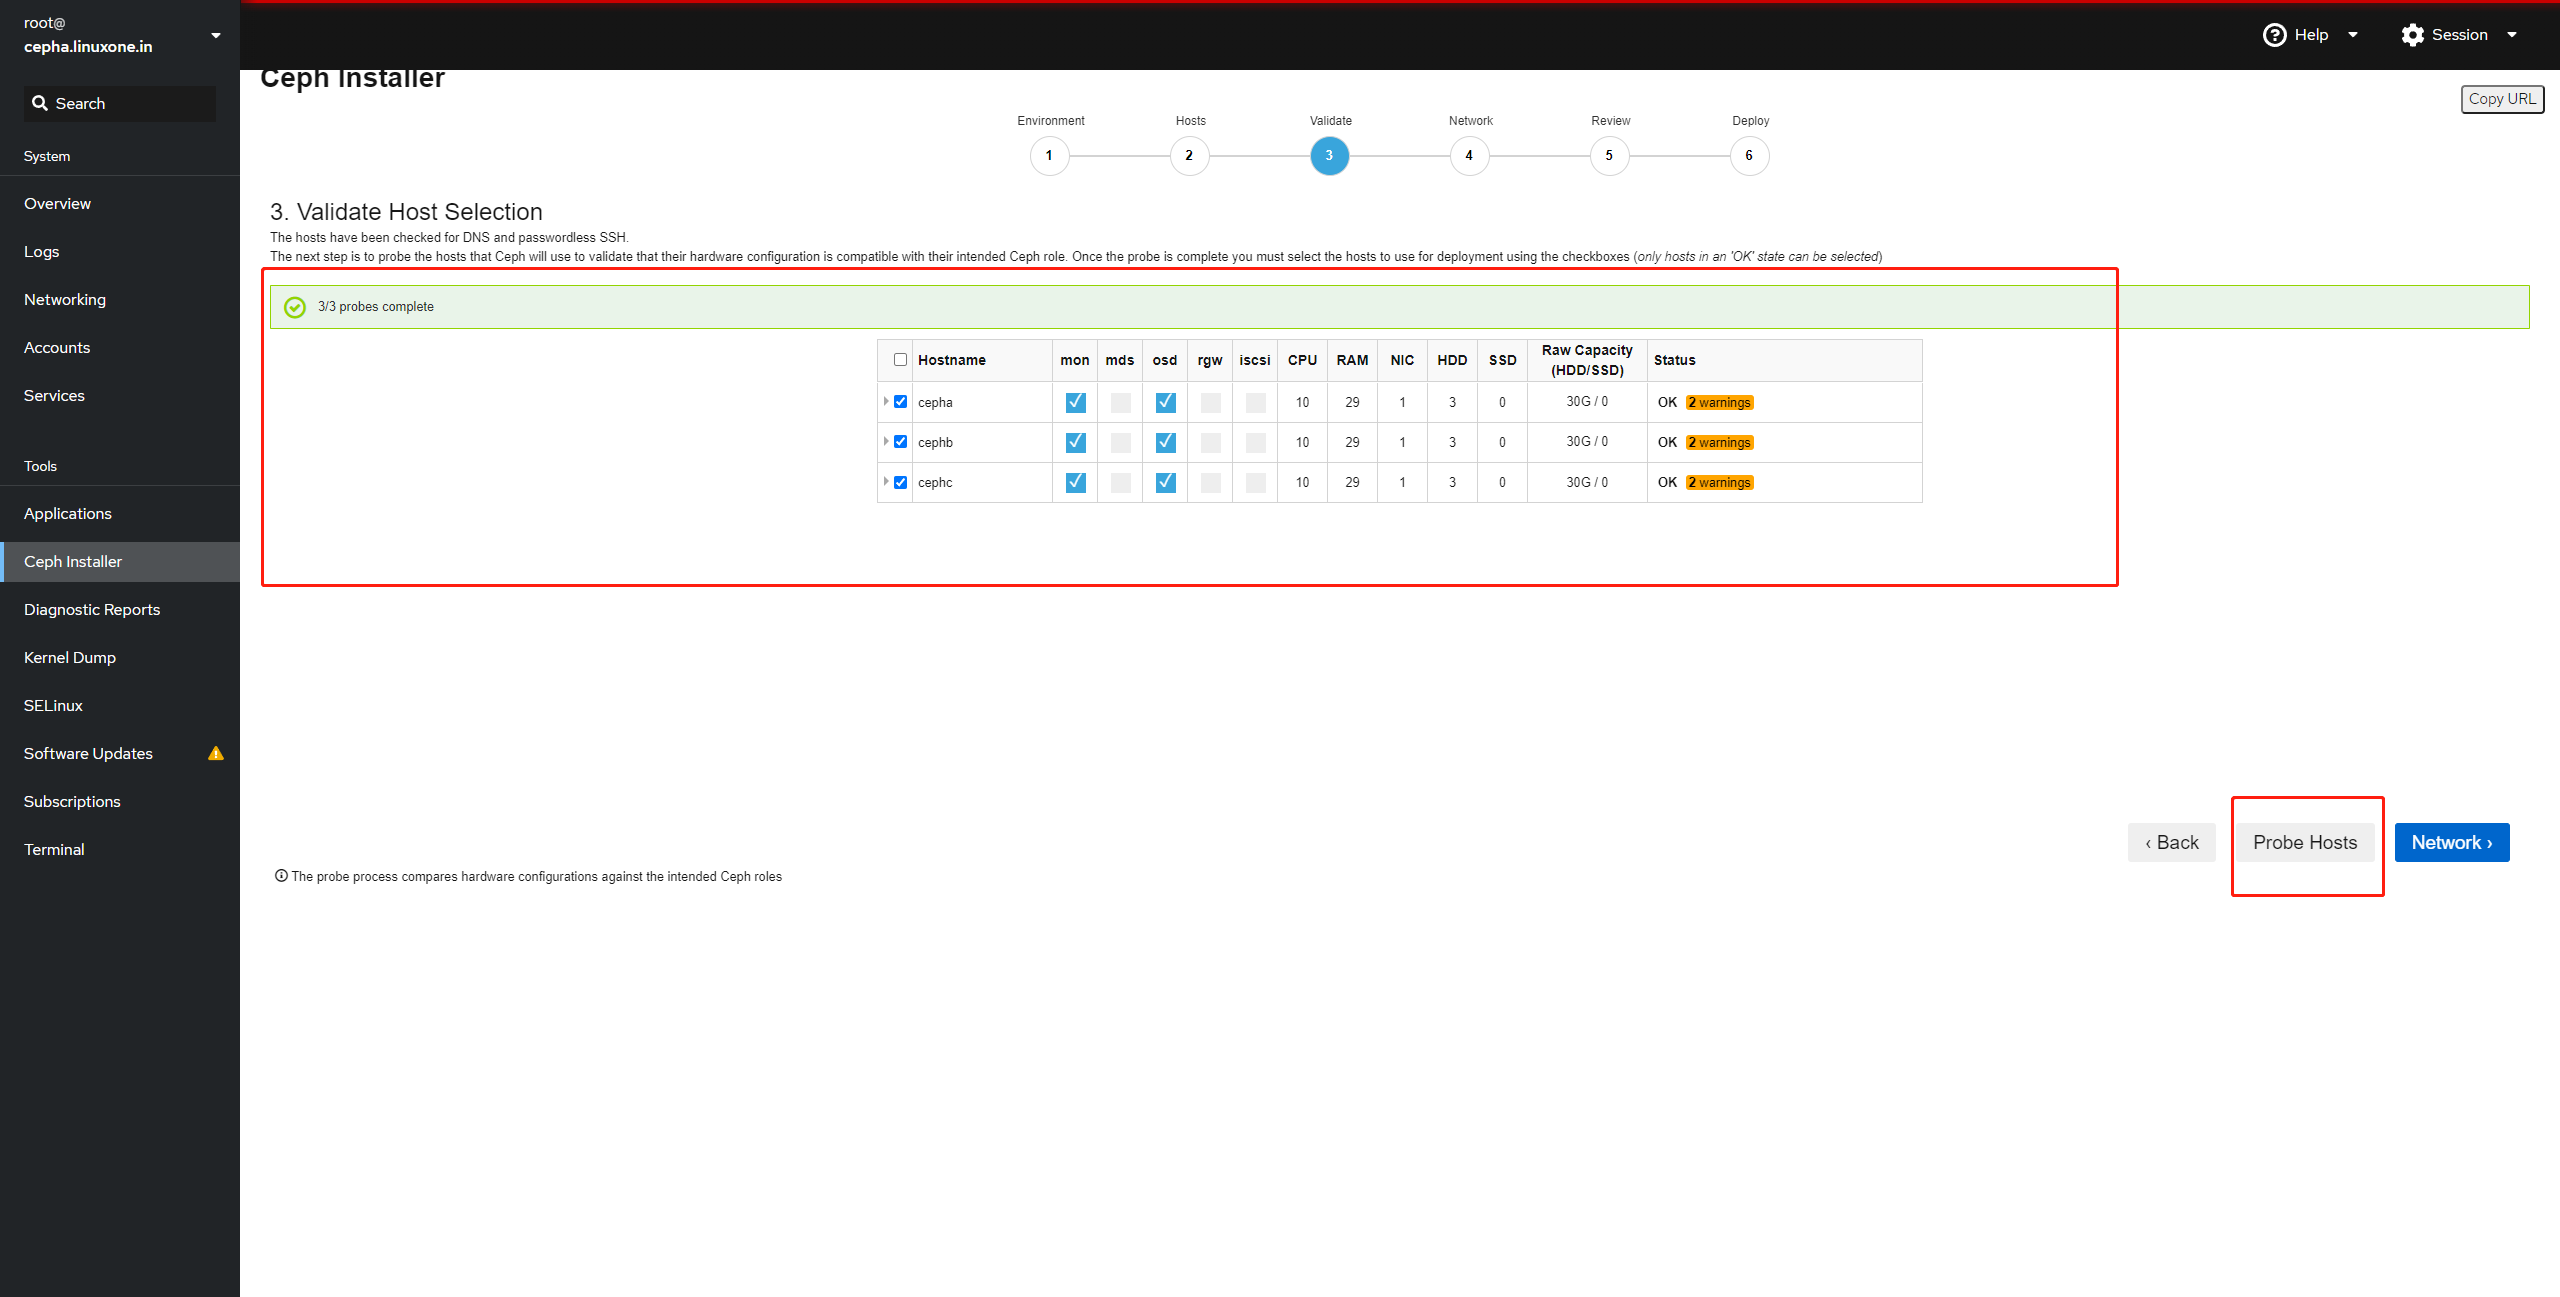
- 5.4 配置网络
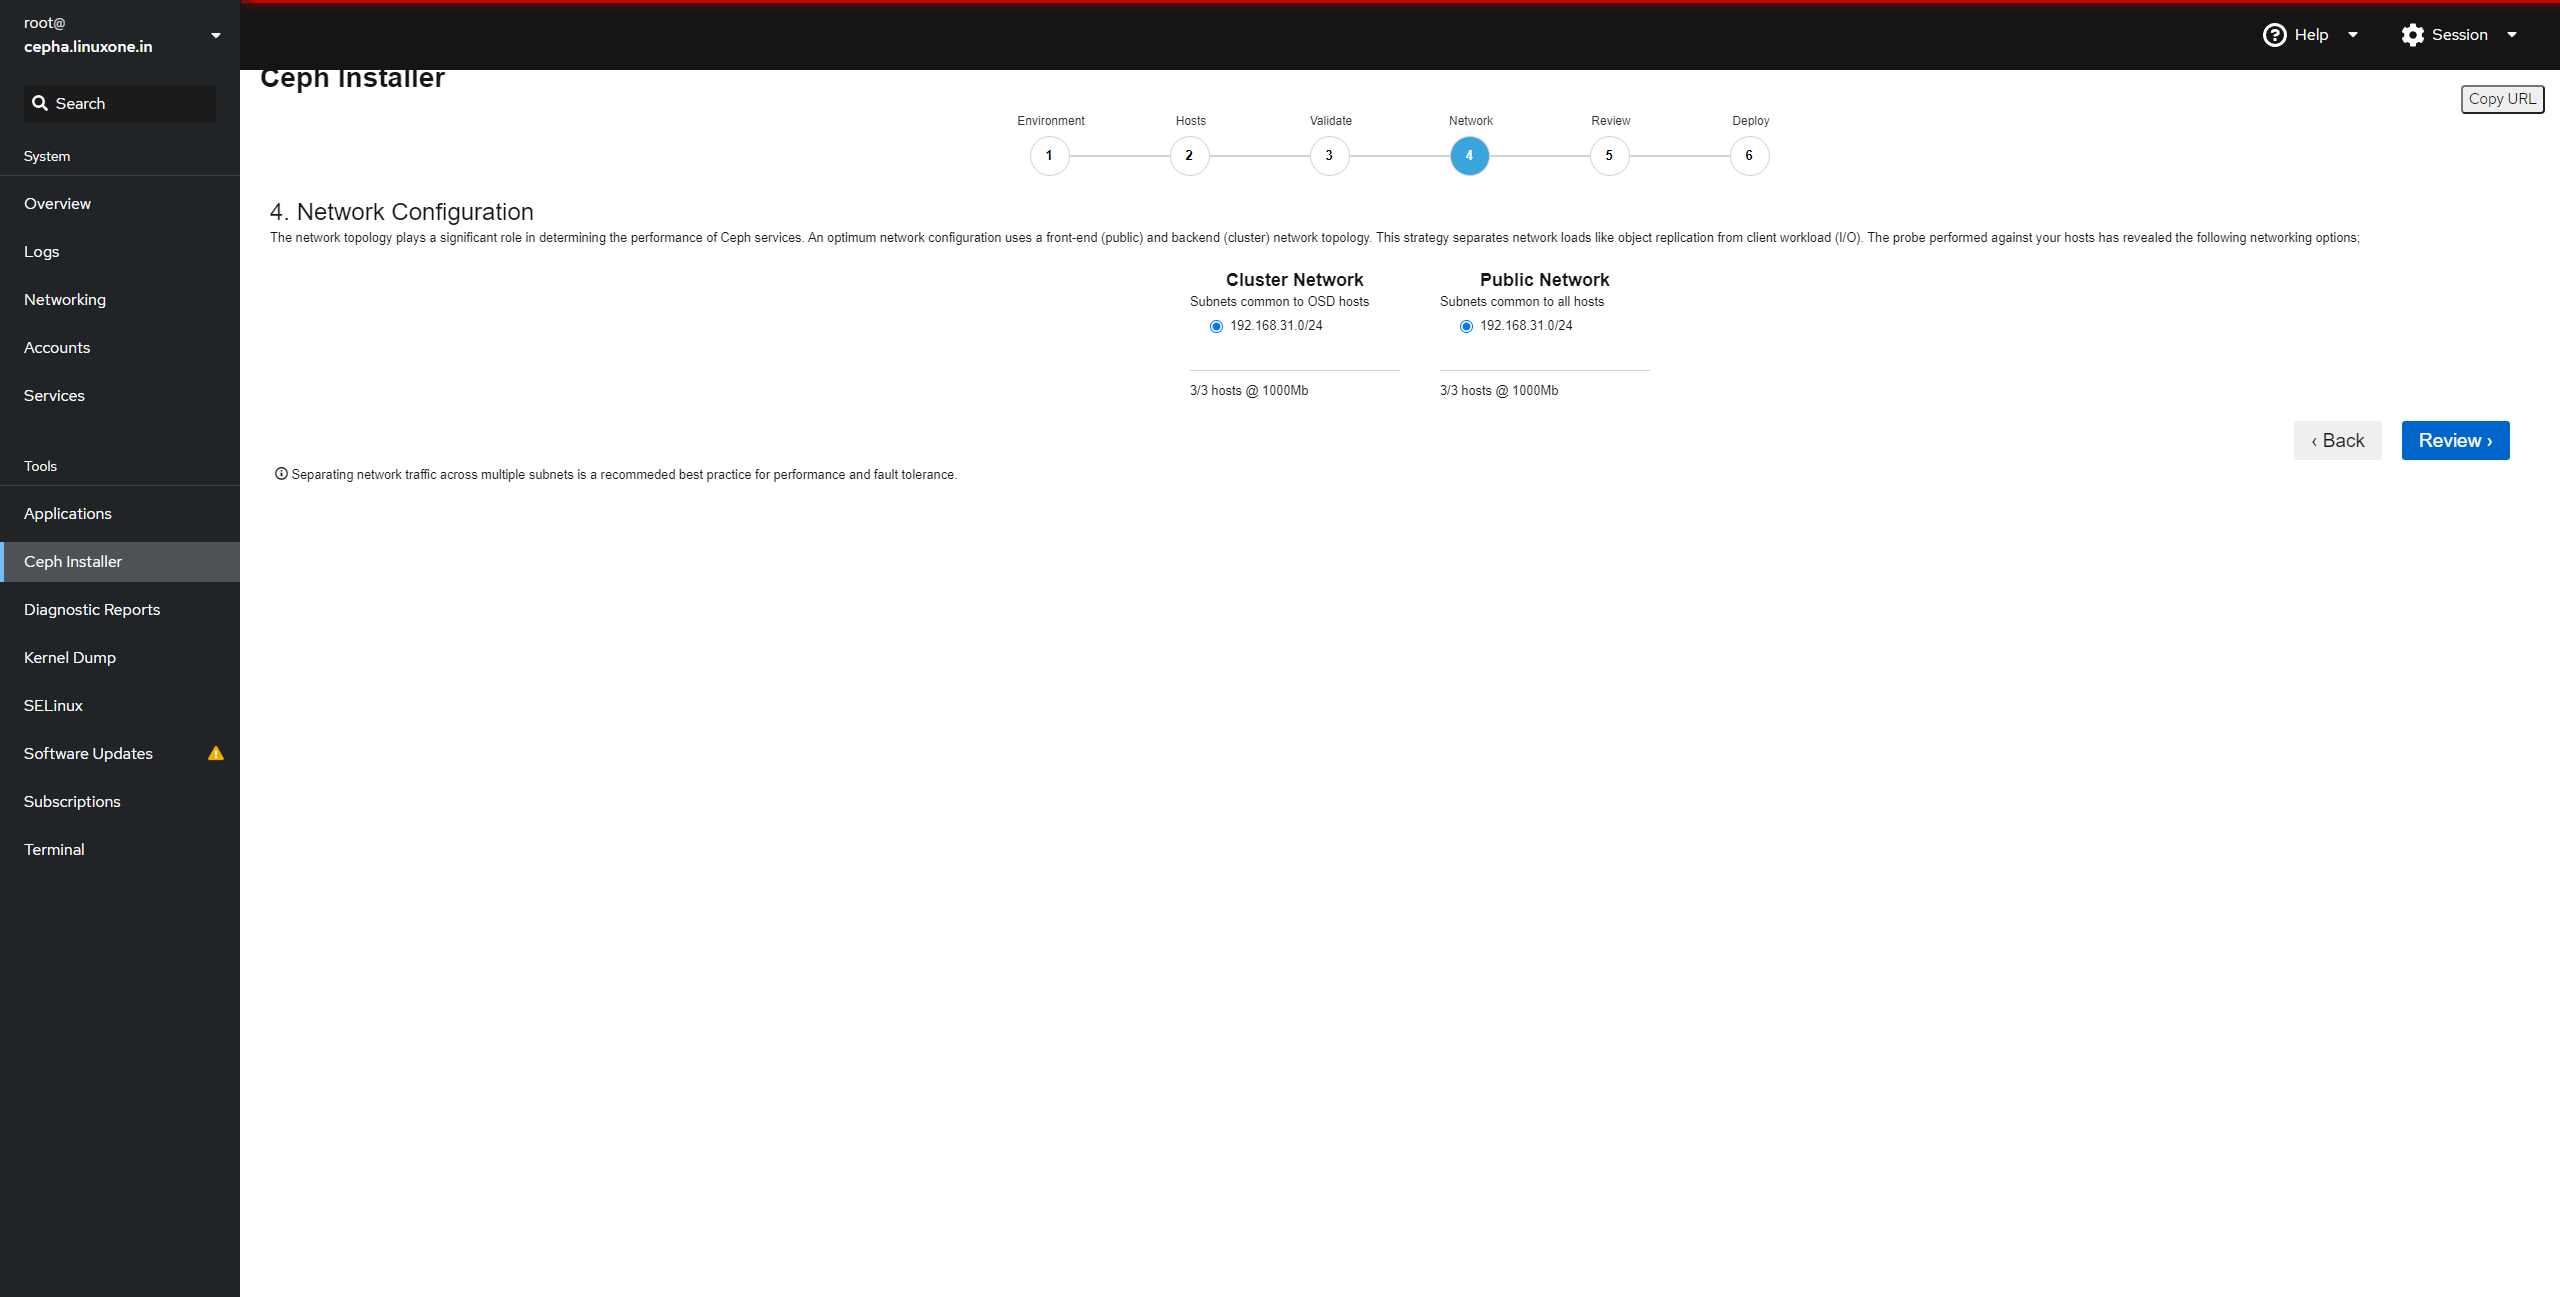
- 5.5 最后检查,点击
save开始部署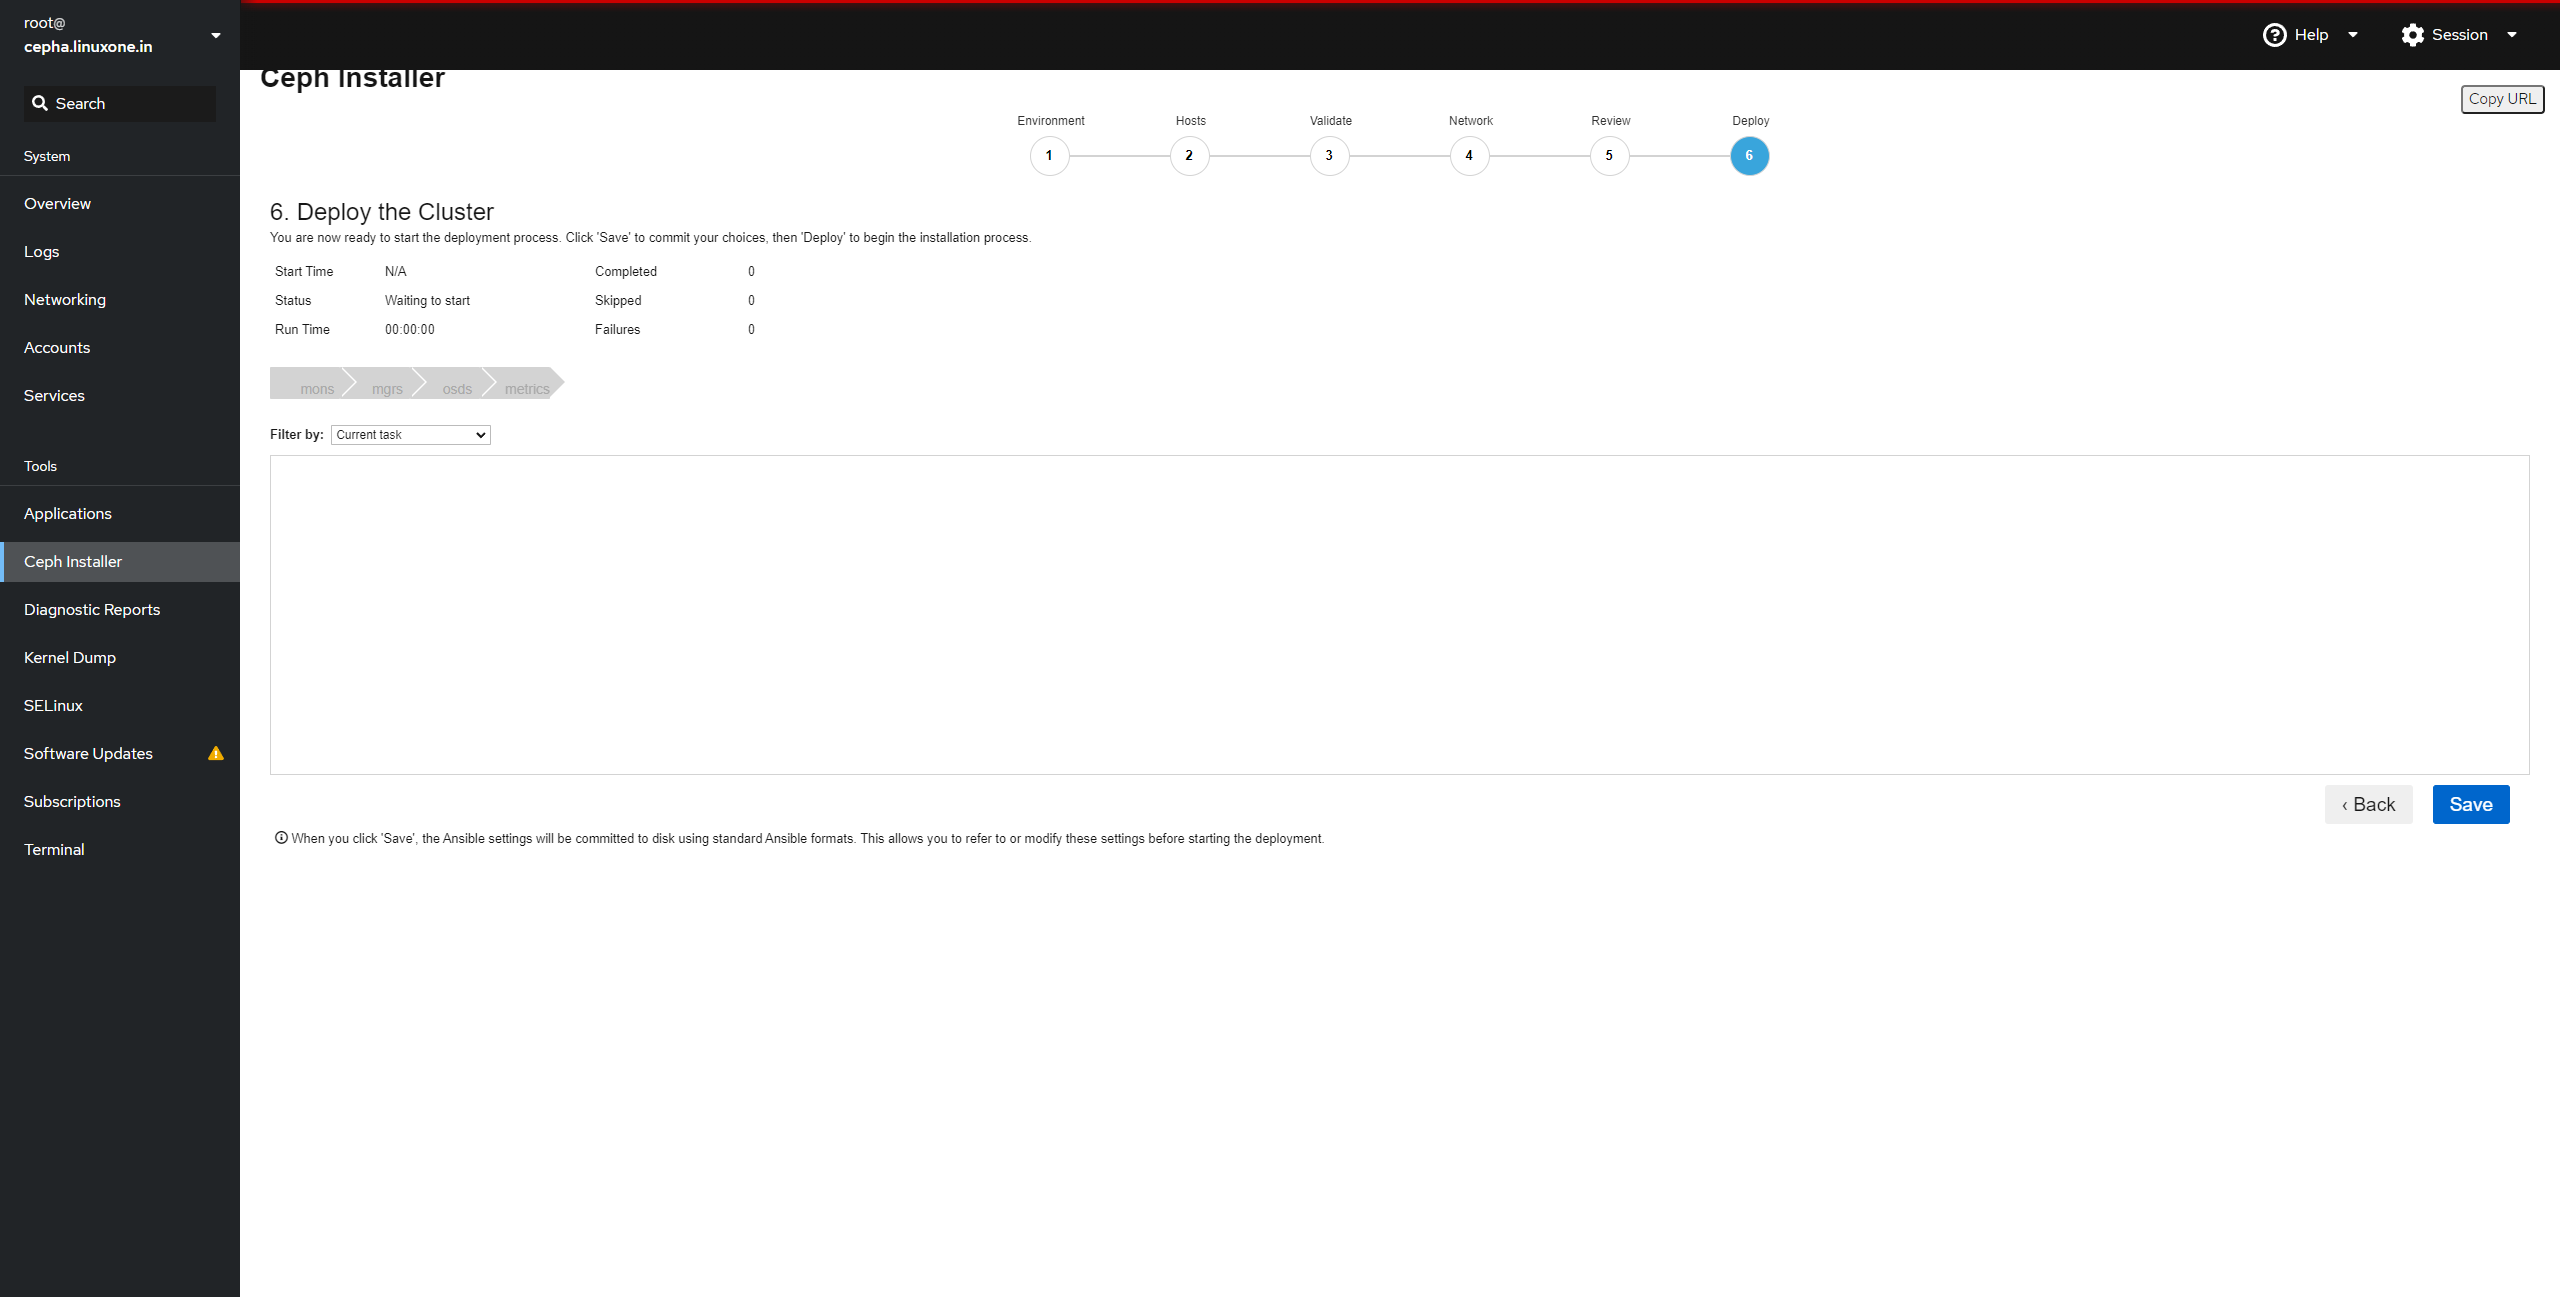
- 部署完成后,点击 complete 出现集群信息
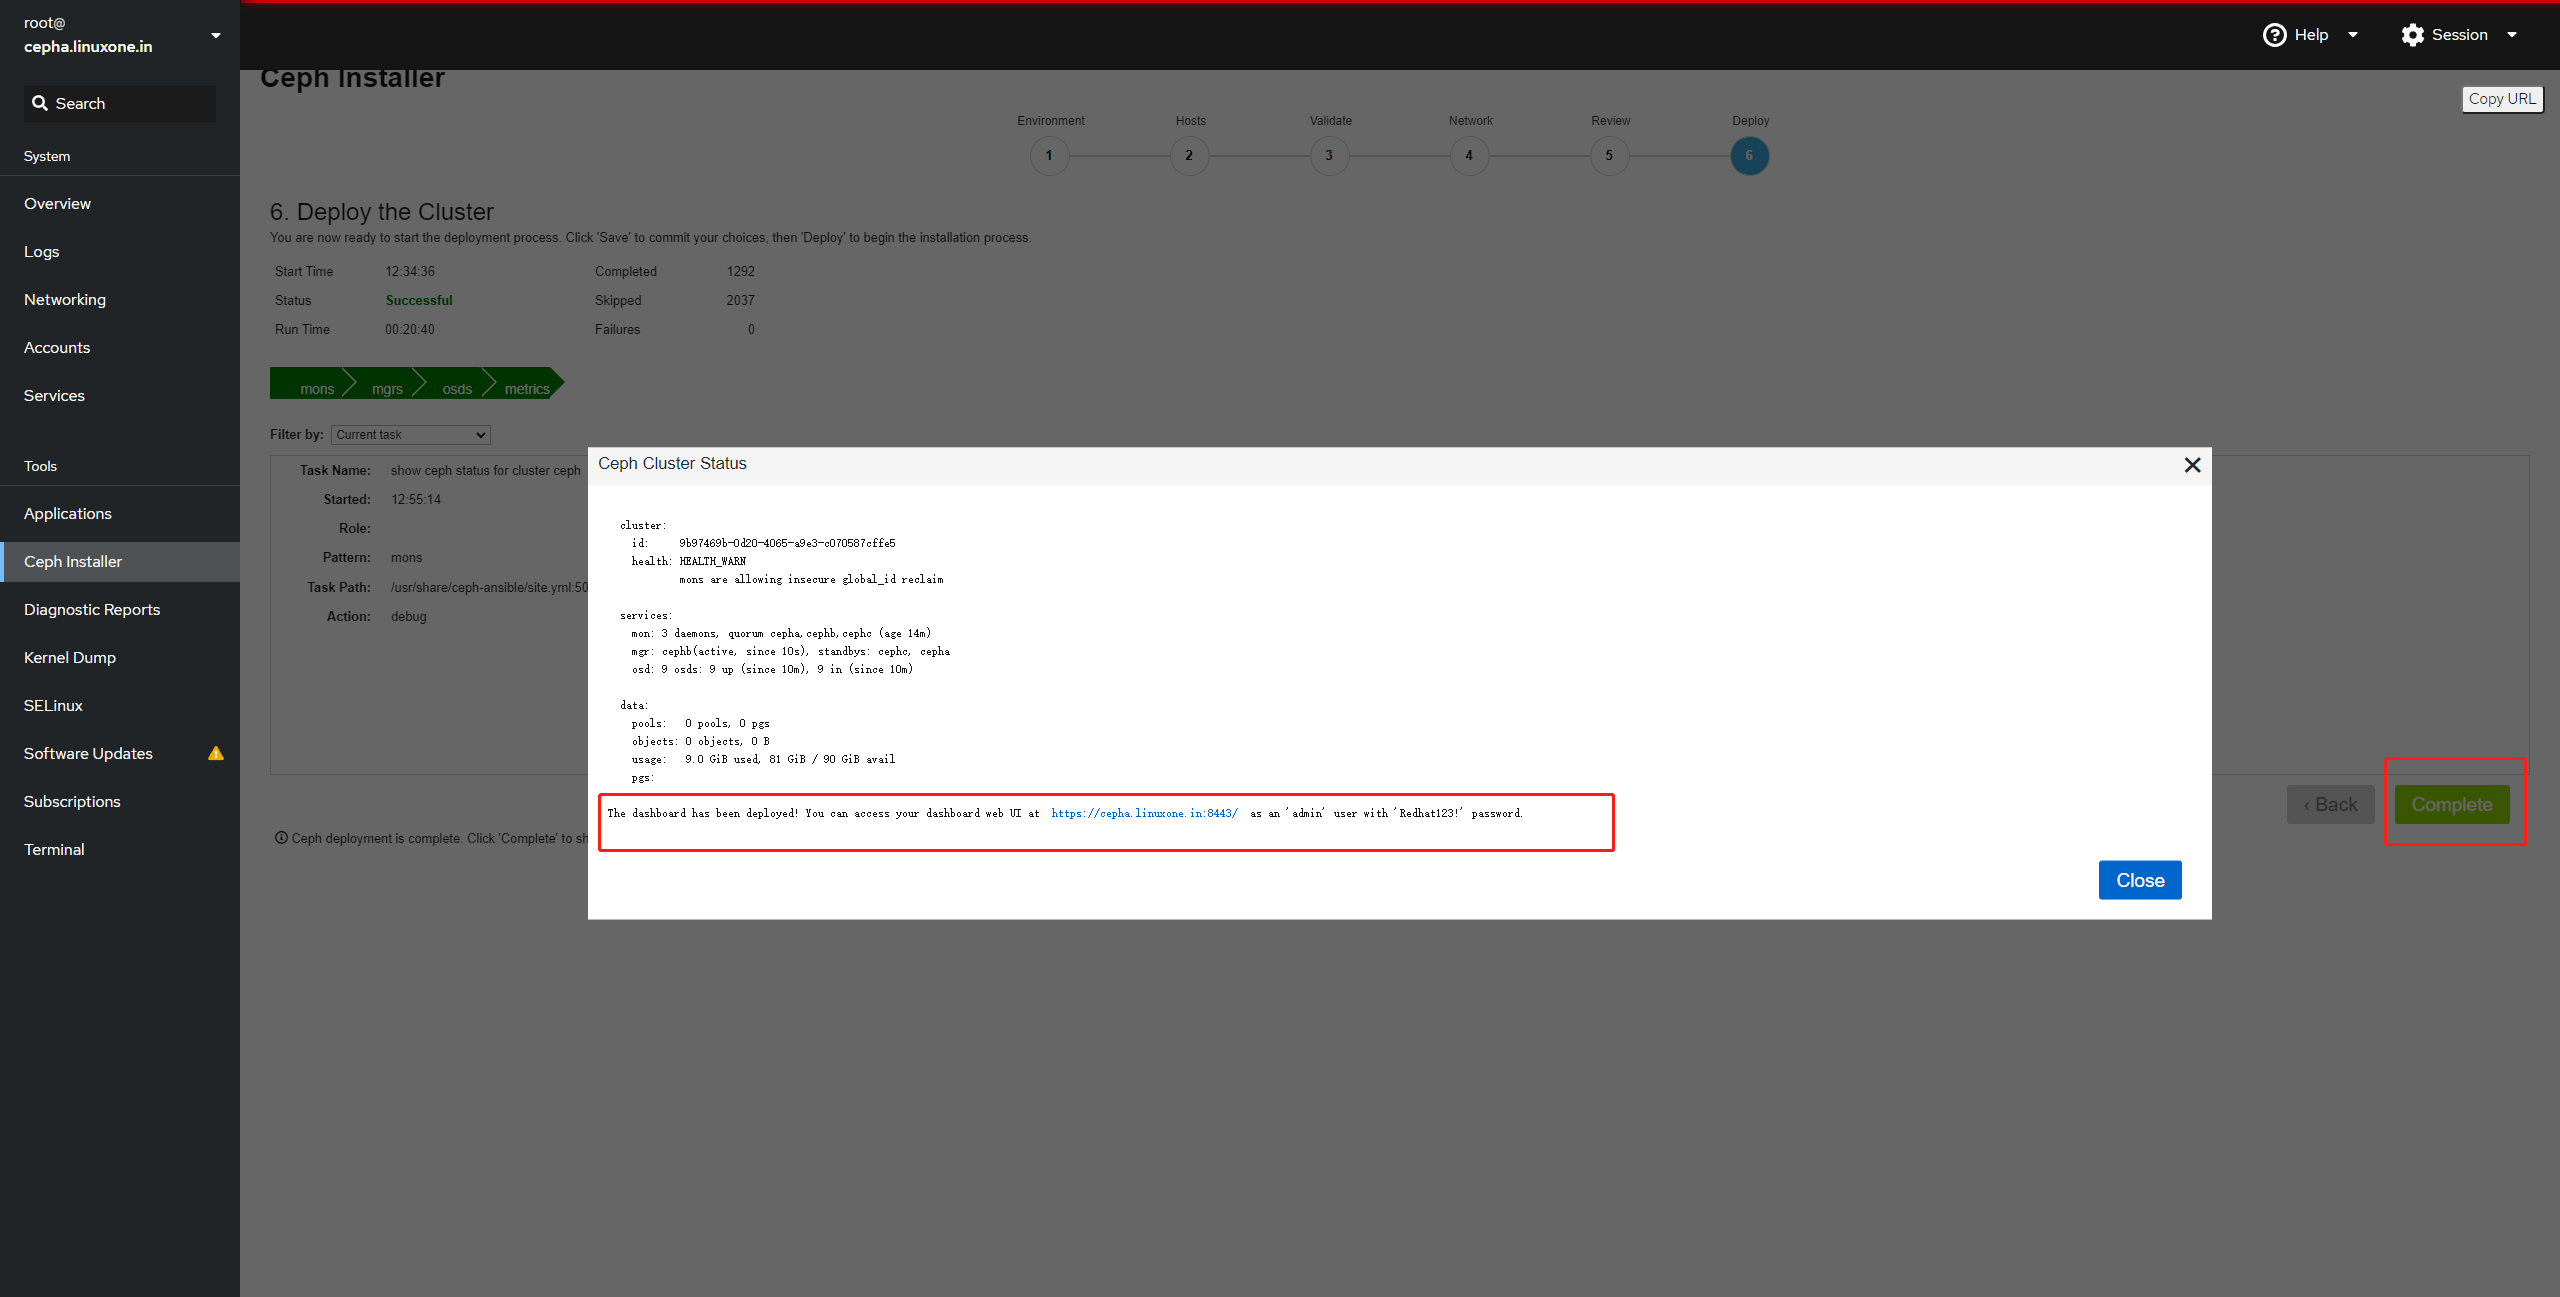
部署完成后会是 warn 状态,禁用不安全模式:1
# ceph config set mon auth_allow_insecure_global_id_reclaim false
- 部署完成后,点击 complete 出现集群信息
使用 ceph-ansible 容器化部署 ceph 集群
- 安装 ceph-ansible 软件包
1
# dnf install ceph-ansible
- 安装 ceph-ansible 软件包
- 修改 group_vars/all.yml 文件中的内容
1
2
3
4
5
6
7
8
9
10
11
12
13
14
15
16
17
18
19
20
21
22
23
24
25
26
27
28
29
30
31
32
# cat all.yml
---
dummy:
ntp_service_enabled: true
ceph_origin: repository
ceph_repository: rhcs
ceph_rhcs_version: 4
ceph_iscsi_config_dev: false
rbd_cache: "true"
rbd_cache_writethrough_until_flush: "false"
monitor_interface: ens33
public_network: 192.168.31.0/24
cluster_network: 192.168.31.0/24
ceph_conf_overrides:
global:
mon_clock_drift_allowed: 0.5
mon_pg_warn_min_per_osd: 0
ceph_docker_image: "rhceph/rhceph-4-rhel8"
ceph_docker_image_tag: "latest"
ceph_docker_registry: "registry.redhat.io"
ceph_docker_registry_auth: true
ceph_docker_registry_username: <--
ceph_docker_registry_password: <--
containerized_deployment: True
dashboard_admin_user: admin
dashboard_admin_password: redhat
node_exporter_container_image: registry.redhat.io/openshift4/ose-prometheus-node-exporter:v4.6
grafana_admin_user: admin
grafana_admin_password: redhat
grafana_container_image: registry.redhat.io/rhceph/rhceph-4-dashboard-rhel8:4
prometheus_container_image: registry.redhat.io/openshift4/ose-prometheus:v4.6
alertmanager_container_image: registry.redhat.io/openshift4/ose-prometheus-alertmanager:v4.6
- 修改 group_vars/all.yml 文件中的内容
- 修改 group_vars/osd.yml 中的内容
1
2
3
4
devices:
- /dev/sdb
- /dev/sdc
- /dev/sdd
- 修改 group_vars/osd.yml 中的内容
- 编写 hosts 主机清单
1
2
3
4
5
6
7
8
9
10
11
12
13
14
15
16
17
18
# cat hosts
[grafana-server]
cepha.linuxone.in
[mons]
cepha.linuxone.in
cephb.linuxone.in
cephc.linuxone.in
[mgrs]
cepha.linuxone.in
cephb.linuxone.in
cephc.linuxone.in
[osds]
cepha.linuxone.in
cephb.linuxone.in
cephc.linuxone.in
- 编写 hosts 主机清单
- 运行安装 playbook
1
2
# cd /usr/share/ceph-ansible
# ansible-playbook site-container.yml -i hosts
- 运行安装 playbook
- 开启 dashboard 的 ssl
1
2
3
4
# ceph dashboard create-self-signed-cert
# ceph config set mgr mgr/dashboard/ssl true
# ceph mgr module disable dashboard
# ceph mgr module enable dashboard
- 开启 dashboard 的 ssl
- 在 cephb 和 cephc 节点上部署 RGW 网关
7.1 修改 group_vars/all.yml 文件:
1
2
3
radosgw_interface: ens33
client.rgw.cepha.rgw0:
rgw_dns_name: cepha7.2 编辑 group_vars/rgws.yml 文件
1
2
3
# cp rgws.yml.sample rgws.yml
# vim rgws.yml
copy_admin_key: true7.3 hosts 文件添加 rgw 节点
1
2
3
[rgws]
cephb.linuxone.in
cephc.linuxone.in7.4 执行部署
1
# ansible-playbook site-container.yml -i hosts --limit rgws
- 部署 iscsi 网关
8.1 编辑 all.yml ,添加以下调优
1
2
3
osd_client_watch_timeout : 15
osd_heartbeat_grace : 20
osd_heartbeat_interval : 58.2 hosts中添加 iscsigws
1
2
3
[iscsigws]
cephb.linuxone.in
cephc.linuxone.in8.3 准备 iscsigws.yml 文件
1
# cp iscsigws.yml.sample iscsigws.yml
8.4 执行安装
1
# $ ansible-playbook site-container.yml --limit iscsigws -i hosts
8.5 起用 iscsi 网关
1
2
# systemctl enable rbd-target-api --now
# gwcli ls
- 配置 cephfs
- 9.1 hosts 中添加 mdss
1
2
[mdss]
cepha.linuxone.in - 9.2 执行安装
1
# ansible-playbook -i hosts site-container.yml --limit mdss
ceph 4 常用操作
- 纠删码配置文件的操作
1
2
3
4
5
6
列出现有的配置文件
# ceph osd erasure-code-profile ls
查看现有配置文件的配置信息
# ceph osd erasure-code-profile get
移除现有的配置文件
# ceph osd erasure-code-profile rm
- 纠删码配置文件的操作
- 操作和管理池
1
2
3
4
5
6
7
8
9
10
11
重命名池
# ceph osd pool rename
删除池
# ceph osd pool delete
防止删除特定的池
# ceph osd pool set pool_name nodelete true
查看所以后的池以及池配置
# ceph osd lspools
# ceph osd pool ls detail
设置配额
# ceph osd pool set-quota
- 操作和管理池
- 示例 创建一个 xxxpool 具有 64 个 PG,副本数为 3 , rbd 类型, pg_auto_scaple 模式开启
1
2
3
4
# ceph osd pool create xxxpool 64 64 replicated
# ceph osd pool set xxxpool size 3
# ceph osd pool application enable xxxpool rbd
# ceph osd pool set xxxpool pg_autoscale_mode on
- 示例 创建一个 xxxpool 具有 64 个 PG,副本数为 3 , rbd 类型, pg_auto_scaple 模式开启
- ceph 获取 crushdump 并解译显示 crush 可调项
1
2
# ceph osd getcrushmap -o ./map.bin
# crushtool -d ./map.bin -o ./map.txt1
# ceph osd crush show-tunables
- ceph 获取 crushdump 并解译